Tag: Baking

  • The Ultimate Cinnamon Roll Recipe: A Step-by-Step Guide to Perfect Homemade Rolls

    The Ultimate Cinnamon Roll Recipe: A Step-by-Step Guide to Perfect Homemade Rolls

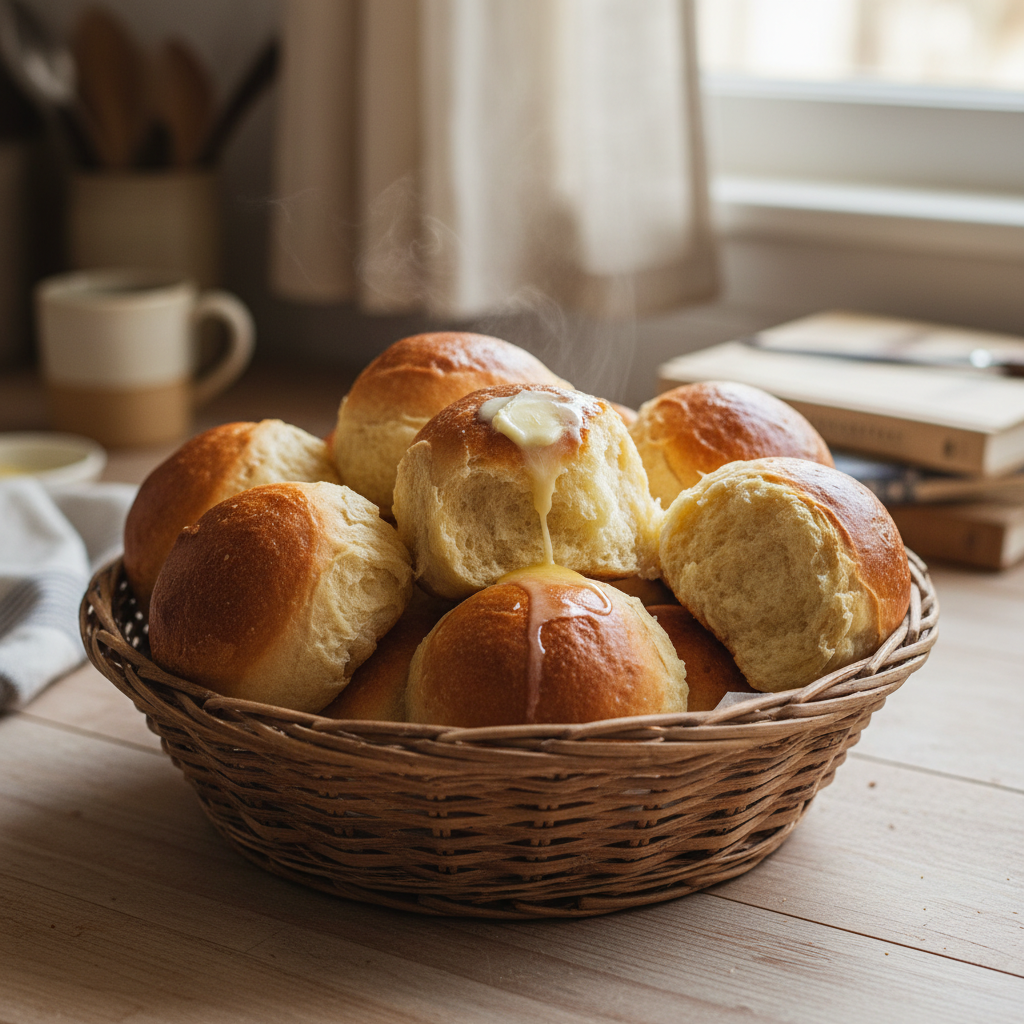
    A classic cinnamon roll recipe involves making a soft, yeasted dough that is rolled flat and covered with a butter, cinnamon, and sugar filling. The dough is then rolled into a log, sliced into individual rolls, allowed to rise a second time, and baked until golden brown. Finally, the warm rolls are generously topped with a sweet cream cheese icing.

    Imagine waking up to the irresistible aroma of warm, fluffy cinnamon rolls, gooey with sweet filling and topped with rich cream cheese icing. While store-bought versions are convenient, nothing compares to the joy and flavor of the best homemade cinnamon rolls straight from your oven. You might think creating these sweet treats from scratch is a complicated challenge reserved only for seasoned pros, but it doesn’t have to be.

    Here at Recipe-GPT, we believe delicious homemade cinnamon rolls should be accessible to everyone, regardless of their baking skill or busy schedule. This easy cinnamon roll recipe guide is designed to take the guesswork out of the process. It leads you confidently through each step to achieve perfect, mouth-watering results every time. We even have a fantastic no yeast cinnamon rolls option for when you need a warm, comforting treat in a flash!

    Ready to discover how simple and rewarding making your own baked goods can be? Let’s dive into what makes this the ultimate homemade cinnamon roll recipe for beginners. We’ll also show you how AI can help you customize it to your exact taste.

    Why is This the Best Cinnamon Roll Recipe for Beginners?

    Making delicious homemade cinnamon rolls can seem intimidating, but our recipe makes it simple. We’ll help you create perfect, fluffy rolls, making this the best cinnamon roll recipe for beginners.

    Our goal at Recipe-GPT is to make cooking effortless so you can enjoy baking, not stress over it. This homemade cinnamon roll recipe is a perfect example, offering a straightforward approach that delivers reliable results.

    Simple Steps, Big Flavor

    You don’t need advanced skills to make these easy homemade cinnamon rolls. We break down each step into manageable parts, so you can confidently follow along—even if you’re baking yeast dough for the first time.

    • Clear Instructions: Our directions are simple and jargon-free, making them easy for anyone to follow.
    • Common Ingredients: This recipe uses common pantry staples, so you won’t need to hunt for hard-to-find ingredients.
    • Focused Guidance: We guide you through each part of the process, so you never feel lost.

    No-Stress Dough Handling

    Many beginners worry about working with yeast and dough, but this recipe makes it simple. We guide you through activating the yeast correctly so your dough will rise beautifully.

    • Yeast Confidence: Learn to proof yeast correctly to ensure your dough rises perfectly every time.
    • Easy Kneading: Our simple kneading technique requires little effort and creates a soft, pliable dough.
    • Hands-Off Resting: We explain the importance of resting the dough, a crucial step that is mostly passive waiting time.

    Quick Options for Busy Schedules

    We understand that life gets busy, so this recipe prioritizes efficiency with a short active prep time.

    If you’re truly short on time, we also offer a fantastic no-yeast version later in this article. This means warm, fresh, easy cinnamon rolls are always within reach, letting you enjoy them even on your busiest mornings.

    How Recipe-GPT Makes It Even Easier

    This recipe is already beginner-friendly, but Recipe-GPT takes convenience a step further. Our AI adapts the recipe to your specific needs, removing guesswork and making the cooking experience truly personal.

    • Personalized Adjustments: Baking for a smaller group? Our AI instantly adjusts serving sizes.
    • Ingredient Swaps: Missing an ingredient? Recipe-GPT suggests smart substitutions on the fly.
    • Flavor Variations: Want to try a new twist? Get AI-powered ideas for unique fillings and icings.
    • Dietary Needs: Need a dairy-free or gluten-free version? Our AI easily adapts the recipe to fit your dietary needs.

    Recipe-GPT transforms meal planning from a chore into an exciting discovery, offering quick and personalized cooking inspiration. With our help, you can confidently create the best cinnamon rolls for your family.

    What Ingredients Do You Need for Homemade Cinnamon Rolls?

    A flat lay photo showing neatly arranged cinnamon roll ingredients like flour, sugar, butter, eggs, milk, yeast, brown sugar, and cinnamon on a light marble counter.
    A professional food photography, photorealistic, high-quality food magazine photo style flat lay shot of all essential cinnamon roll ingredients neatly arranged on a clean, light-colored marble kitchen countertop. Ingredients include bags of flour, granulated sugar, brown sugar, a bowl of active dry yeast, a carton of milk, a stick of butter, eggs, and a small bowl of ground cinnamon. Shot from directly above, with soft natural light and a shallow depth of field, creating a premium cookbook visual.

    Crafting delicious homemade cinnamon rolls starts with gathering the right ingredients. Fortunately, you likely have many of these staples in your pantry already.

    To make preparation simple, Recipe-GPT can help you identify what you need. It can even suggest smart substitutions if you’re missing an ingredient, so you can get started right away.

    For the Dough

    A soft, fluffy dough is the secret to amazing cinnamon rolls. Here are the essential ingredients for a perfect batch:

    • Warm Milk: This activates your yeast. Aim for lukewarm, around 105-115°F.
    • Active Dry Yeast: This magic ingredient makes your rolls rise beautifully.
    • Granulated Sugar: It feeds the yeast and adds sweetness to the dough.
    • Unsalted Butter: Melted butter adds richness and tenderness to every bite.
    • Large Egg: An egg creates a richer, more tender dough texture.
    • All-Purpose Flour: This forms the foundational structure of your dough.
    • Salt: A pinch enhances all the other wonderful flavors.

    If you’re missing an ingredient, don’t worry. Recipe-GPT can instantly suggest a smart swap based on what you have on hand, providing personalized ideas and easy cooking solutions.

    For the Filling

    The sweet, spiced center is what makes cinnamon rolls so irresistible. Gather these simple items to create that classic flavor:

    • Unsalted Butter: Softened butter is key for easy spreading.
    • Light Brown Sugar: This provides a deep, molasses-like sweetness.
    • Ground Cinnamon: This is the star spice of your delicious rolls.

    Want to get creative? Recipe-GPT can help you explore new flavor combinations, like adding a hint of cardamom or a touch of orange zest. Let the AI inspire new variations for your family-friendly dishes.

    For the Cream Cheese Icing

    No homemade cinnamon roll is truly complete without a decadent cream cheese icing. It balances the sweetness beautifully and adds a lovely tang.

    • Cream Cheese: Softened cream cheese ensures a smooth consistency.
    • Unsalted Butter: Also softened, it adds richness to the icing.
    • Powdered Sugar (Confectioners’ Sugar): This provides a smooth, sweet glaze.
    • Vanilla Extract: It enhances the overall flavor profile.
    • Milk (or Cream): Use this to thin the icing to your desired drizzly consistency.

    Recipe-GPT can also adjust this icing to fit your preferences. Ask for a less sweet version or a dairy-free alternative to get tailored meal inspiration for any dietary need.

    How to Make Easy Homemade Cinnamon Rolls: A Step-by-Step Guide

    A close-up of warm, freshly baked cinnamon rolls topped with white icing in a baking dish.
    A close-up, photorealistic, professional food photography shot of a baking dish filled with freshly baked, warm cinnamon rolls. The rolls are golden brown, generously drizzled with creamy white icing, and stacked slightly to show their soft, swirled texture. A faint wisp of steam rises from the warm rolls. The background is a soft-focused, inviting home kitchen environment with warm, natural light, reflecting a high-quality food magazine photo style and premium cookbook visual.

    Step 1: Activate the Yeast

    The first step to making homemade cinnamon rolls is activating the yeast. This key ingredient is what makes them wonderfully light and fluffy.

    1. Gently warm the milk. It should be lukewarm, not hot, ideally between 105-115°F (40-46°C) [1].
    2. Pour the warm milk into a large bowl.
    3. Sprinkle the active dry yeast over the milk.
    4. Add a pinch of granulated sugar to feed the yeast.
    5. Stir the mixture lightly.
    6. Let it stand for 5-10 minutes. The mixture should become foamy or bubbly, which shows the yeast is alive and ready to work.

    If your yeast doesn’t foam, it might be expired or the milk was too hot/cold. No worries! Recipe-GPT can help. Just ask for tips on reviving old yeast or alternative methods if you’re out of fresh yeast.

    Step 2: Mix the Dough

    With the yeast activated, it’s time to mix the dough for your easy homemade cinnamon rolls.

    1. In a separate large bowl, whisk together the all-purpose flour, remaining sugar, and salt.
    2. Add the melted butter and an egg to the activated yeast mixture. Stir well to combine.
    3. Pour the wet ingredients into the dry ingredients.
    4. Mix with a wooden spoon or a stand mixer with a dough hook until a shaggy dough forms.

    Recipe-GPT can easily adjust this recipe for you. For instance, if you prefer whole wheat flour, our AI can suggest the right proportions and hydration adjustments for a perfect dough.

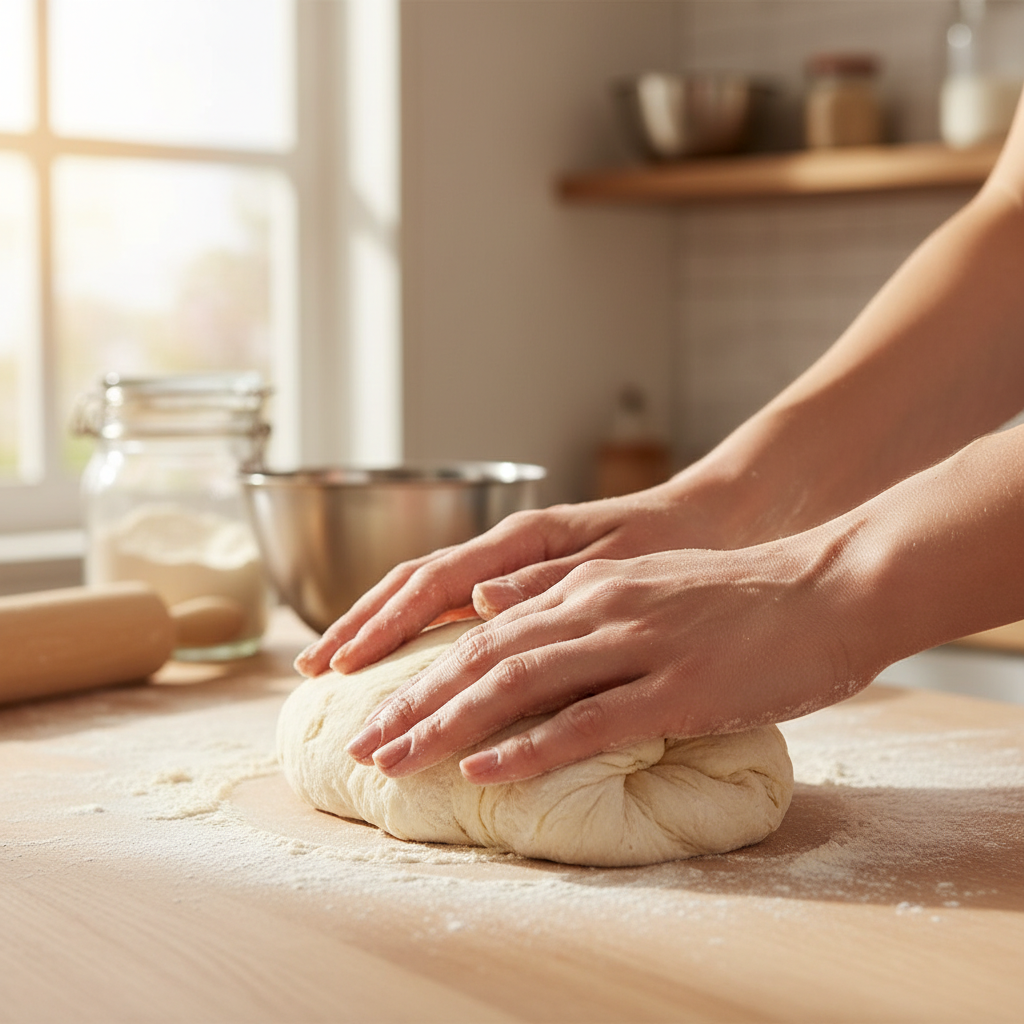
    Step 3: Knead and Let it Rise

    Kneading builds gluten for structure, and the first rise develops flavor and creates an airy texture.

    1. Turn the dough out onto a lightly floured surface.
    2. Knead for 5-7 minutes, until the dough becomes smooth and elastic.
    3. Form the dough into a ball.
    4. Lightly grease a large bowl with cooking spray or oil.
    5. Place the dough ball in the bowl, turning it once to coat the surface.
    6. Cover the bowl with plastic wrap or a clean kitchen towel.
    7. Let the dough rise in a warm place for 1-1.5 hours, or until it has doubled in size.

    Need ideas for a warm spot? Recipe-GPT suggests placing it in a slightly warm oven (turned off) or near a sunny window. If you’re short on time, AI can even help find quick cinnamon rolls recipes with faster rising options.

    Step 4: Prepare the Filling

    While the dough rises, prepare the irresistible cinnamon-sugar filling. This part is quick and simple.

    1. In a medium bowl, combine the softened butter, brown sugar, and ground cinnamon.
    2. Mix until the ingredients form a thick, spreadable paste.

    Feeling creative? Recipe-GPT can offer personalized recipe suggestions for filling variations. Consider adding a pinch of nutmeg, cardamom, or even some finely chopped pecans for an extra crunch.

    Step 5: Roll and Fill the Dough

    Now it’s time to combine the dough and filling to create those iconic swirls.

    1. Once the dough has doubled in size, gently punch it down to release the air.
    2. Turn the dough out onto a lightly floured surface.
    3. Use a rolling pin to roll the dough into a large rectangle, about 12×18 inches (30×45 cm).
    4. Spread the cinnamon filling evenly over the dough, leaving a small, clean border along one long edge.

    Our AI-powered recipe generator can help if you want to adjust the filling. If you prefer less sugar or more spice, Recipe-GPT can provide instant, tailored meal inspiration for your taste buds.

    Step 6: Cut the Rolls and Let Them Rise Again

    Next, you’ll cut the log into individual rolls and let them rise a second time. This final rise makes them extra fluffy.

    1. Starting from the long edge, roll the dough into a tight log.
    2. Pinch the seam to seal it closed.
    3. Use a sharp knife or unflavored dental floss to cut the log into 12 equal pieces, each about 1.5 inches (4 cm) thick.
    4. Lightly grease a 9×13 inch baking dish.
    5. Arrange the rolls in the dish, leaving a little space between them.
    6. Cover the dish with plastic wrap or a clean towel.
    7. Let the rolls rise in a warm place for another 30-45 minutes, until they look puffy.

    Recipe-GPT can quickly adjust serving sizes. If you need more or fewer rolls, our AI can tell you how to scale the recipe and even suggest the perfect baking dish size.

    Step 7: Bake to Golden Perfection

    It’s time to bake! The oven will transform your risen dough into golden, fragrant cinnamon rolls.

    1. Preheat your oven to 375°F (190°C).
    2. Uncover the risen rolls.
    3. Bake for 20-25 minutes, until they are golden brown and cooked through.
    4. If the tops brown too quickly, loosely cover them with foil.
    5. Once baked, remove the rolls from the oven and let them cool slightly in the pan.

    Need baking tips for different oven types? Recipe-GPT provides personalized cooking guidance. Our AI can help you confidently bake diverse recipes, ensuring perfect results every time.

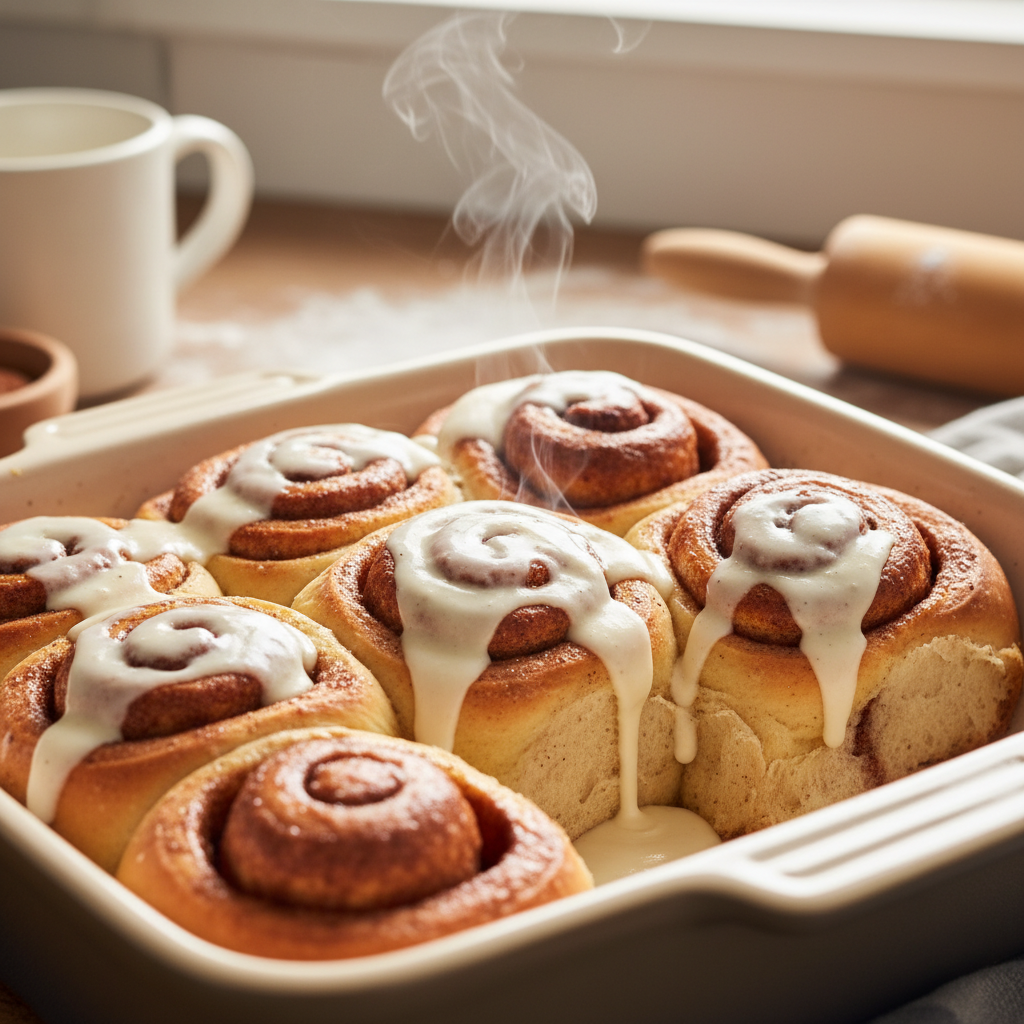
    Step 8: Whip Up the Icing

    No cinnamon roll is complete without a luscious cream cheese icing. This final step is fast and delicious.

    1. In a medium bowl, combine the softened cream cheese, softened butter, powdered sugar, and vanilla extract.
    2. Beat with an electric mixer until the icing is smooth and creamy.
    3. If the icing is too thick, add a splash of milk until it reaches a spreadable consistency.
    4. Spread the icing generously over the warm cinnamon rolls.
    5. Serve immediately and enjoy your delicious creation!

    Recipe-GPT offers instant, AI-generated recipe suggestions for icing variations. You could try an orange zest icing, a maple glaze, or a simple vanilla drizzle for a different flavor twist.

    Need a Quicker Version? Try This Cinnamon Roll Recipe with No Yeast

    Craving delicious homemade cinnamon rolls but don’t have hours for yeast to rise? We get it. This fantastic no yeast cinnamon roll recipe is your solution for busy mornings or unexpected sweet cravings.

    With Recipe-GPT, making these easy cinnamon rolls is even simpler. Our AI can tailor the recipe just for you, letting you adjust the sweetness level or use ingredients you already have on hand. Let’s get baking!

    No-Yeast Dough Ingredients

    Forget the waiting game! This quick dough comes together in minutes. Here’s what you’ll need for these speedy cinnamon rolls:

    • All-Purpose Flour: 2 cups
    • Granulated Sugar: 2 tablespoons
    • Baking Powder: 1 tablespoon
    • Salt: 1/2 teaspoon
    • Unsalted Butter (cold, cubed): 1/4 cup (4 tablespoons)
    • Milk (cold): 3/4 cup
    • Vanilla Extract: 1 teaspoon (optional, but adds flavor)

    Missing an ingredient? Don’t worry. Recipe-GPT can suggest simple substitutions. For example, just ask our AI for alternatives to milk or butter to keep your baking on track.

    Quick Instructions for No-Yeast Rolls

    These quick cinnamon rolls are incredibly simple to make. You’ll be enjoying warm, gooey rolls in under an hour. Just follow these easy steps:

    1. Preheat Oven: Set your oven to 400°F (200°C) and lightly grease an 8×8 inch baking dish.
    2. Combine Dry Ingredients: In a large bowl, whisk together the flour, sugar, baking powder, and salt to ensure they are evenly distributed.
    3. Cut in Butter: Add the cold, cubed butter. Using a pastry cutter or your fingertips, cut the butter into the flour until the mixture resembles coarse crumbs. This step creates flaky layers.
    4. Add Wet Ingredients: Pour in the cold milk and vanilla extract (if using). Stir with a fork only until the dough is just combined. Be careful not to overmix.
    5. Knead Briefly: Turn the dough out onto a lightly floured surface and knead gently for about 30 seconds until it comes together smoothly.
    6. Roll the Dough: Roll the dough into an approximately 12×8 inch rectangle.
    7. Prepare and Add Filling: To make the filling, first melt 3 tablespoons of butter. In a separate small bowl, mix 1/2 cup of brown sugar with 1 tablespoon of cinnamon. Brush the melted butter evenly over the dough, then sprinkle the cinnamon-sugar mixture on top.
    8. Roll and Slice: Starting from one of the long sides, carefully roll the dough into a tight log. Use a sharp knife to slice the log into 8-9 equal pieces, each about 1 to 1.5 inches thick.
    9. Arrange and Bake: Place the cinnamon rolls cut-side up in your prepared baking dish. Bake for 18-22 minutes, or until the tops are golden brown.
    10. Add Icing: While the rolls are still warm, drizzle your favorite cream cheese icing over them. Our AI can even help you whip up a quick icing recipe with what you have on hand!

    These easy homemade cinnamon rolls are a true game-changer for busy bakers. To make them even better, use Recipe-GPT to personalize the recipe. You can instantly adjust the serving size or ask our AI to create simple variations, like a high-protein version, for a treat that’s perfect for you.

    How Can AI Help Personalize Your Cinnamon Rolls?

    Find Ingredient Substitutions

    Ever realized you’re missing an ingredient halfway through baking your favorite cinnamon rolls? It happens to everyone, but there’s no need to panic.

    Recipe-GPT is here to help. Our AI quickly suggests smart substitutions, saving you a last-minute trip to the store and keeping your baking plans on track.

    Here are some common examples for your cinnamon rolls:

    • No milk? You can often use water, buttermilk, or a non-dairy alternative like almond or oat milk. The AI will explain exactly how to make the swap.
    • Out of active dry yeast? Recipe-GPT can guide you on using instant yeast instead, including any small adjustments needed for a perfect rise.
    • Missing brown sugar for the filling? Our AI can suggest creating a substitute with white sugar and molasses to perfectly mimic the flavor and texture.

    Just ask Recipe-GPT what you have on hand, and it will provide practical alternatives for your easy homemade cinnamon rolls.

    Adjust Serving Sizes Instantly

    Whether you need a large batch of cinnamon rolls for a party or just a small treat for yourself, adjusting a recipe can be tricky. Every ingredient must be changed accurately to get it right.

    Recipe-GPT makes it simple. Our AI instantly scales any recipe up or down, which means no more complicated math or guesswork. You get perfect portions every time.

    Consider these examples for your best cinnamon rolls recipe:

    • Baking for a crowd? Tell Recipe-GPT how many servings you need, and it will automatically double, triple, or adjust the recipe accordingly.
    • Making a small batch? If you only want a few cinnamon rolls, our AI will precisely reduce each ingredient for you, preventing food waste.

    Recipe-GPT handles all the calculations, so you can focus on the fun part: baking delicious, easy cinnamon rolls.

    Discover New Flavor Variations

    Love classic cinnamon rolls but want to try something new? Our AI-powered platform is your creative partner, suggesting exciting flavor twists to ensure your baking never gets boring.

    Recipe-GPT offers endless personalized suggestions, helping you discover variations beyond traditional cinnamon and tailor your treats to any occasion or preference.

    Think about these delicious ideas for your next batch:

    • Spice it up: Ask for variations that include cardamom, pumpkin spice, or a hint of ginger.
    • Add some texture: Get suggestions for mixing in chopped pecans, walnuts, dried cranberries, or chocolate chips.
    • Try a new glaze: Instead of traditional cream cheese icing, explore options like maple, coffee, or orange zest glaze.

    With Recipe-GPT, you get unique ideas quickly, ensuring your homemade cinnamon rolls are always a delightful surprise. Enjoy fresh, personalized inspiration every time you bake.

    Frequently Asked Questions

    What is the secret to fluffy cinnamon rolls?

    The secret to creating truly fluffy cinnamon rolls lies in a few key steps. First, active yeast is crucial for a proper rise. Second, kneading the dough correctly develops gluten, which creates a soft, elastic texture.

    Next, it’s essential to allow enough time for the dough to rise in a warm, draft-free environment. This gives the yeast ample opportunity to work and helps the dough expand. Finally, avoid overbaking. Pull the rolls from the oven when they are lightly golden to keep them moist and tender.

    Recipe-GPT takes the guesswork out of baking by providing precise, step-by-step instructions. It guides you through activating yeast, kneading, and rising to guarantee fluffy, delicious results every time.

    Can you make an easy cinnamon roll recipe with no yeast?

    Yes, you can absolutely make delicious cinnamon rolls without yeast! These “no-yeast” versions are perfect for a quick treat, especially when you’re short on time.

    Instead of yeast, these recipes use a leavening agent like baking powder or baking soda, which eliminates rising time. While the texture is slightly different—often resembling a biscuit or scone—they still deliver that amazing cinnamon-sugar flavor you crave.

    Recipe-GPT offers a fantastic solution for busy mornings. Simply ask for a “no yeast cinnamon rolls” recipe, and the AI will instantly generate fast, practical inspiration tailored to your need for speed.

    How do you make easy cinnamon rolls from scratch?

    Making easy homemade cinnamon rolls from scratch is simpler than you might imagine. Our guide breaks the process down into clear, manageable steps. Here’s a quick overview:

    1. Activate the yeast: Combine it with warm milk and a touch of sugar.
    2. Mix the dough: Add flour, butter, sugar, and salt to the yeast mixture.
    3. Knead and rise: Knead until smooth, then let it rise until doubled in size.
    4. Prepare the filling: Mix butter, brown sugar, and cinnamon.
    5. Roll and fill: Roll the dough into a large rectangle and spread the filling evenly.
    6. Roll and slice: Tightly roll the dough into a log and cut it into individual rolls.
    7. Second rise: Place rolls in a pan and let them rise briefly again.
    8. Bake: Bake until golden brown and cooked through.
    9. Prepare icing: Whisk together cream cheese, butter, powdered sugar, and vanilla.
    10. Ice and serve: Spread the icing generously over the warm rolls.

    Recipe-GPT makes this entire process intuitive by providing clear, beginner-friendly guidance. You’ll move from step to step with confidence, transforming mealtime indecision into an enjoyable cooking experience.

    How long does it take to make cinnamon rolls?

    The total time depends on whether you choose a traditional yeast-based recipe or a quicker no-yeast version. Yeast-based rolls require rising time, while no-yeast rolls are ready much faster.

    • For traditional yeast cinnamon rolls:
      • Active prep time: Around 30-45 minutes.
      • First rising time: Typically 1-2 hours.
      • Second rising time: About 30-45 minutes.
      • Baking time: Approximately 20-25 minutes.
      • Total estimated time: 2.5 to 3.5 hours.
    • For quick, no-yeast cinnamon rolls:
      • Active prep time: Around 30 minutes.
      • Rising time: None required.
      • Baking time: Approximately 20-25 minutes.
      • Total estimated time: As little as 50-60 minutes.

    Recipe-GPT helps you choose a recipe that fits your schedule. If you’re short on time, just ask for “quick cinnamon rolls” to get personalized suggestions instantly. This ensures your baking fits perfectly into your busy life.


    Sources

    1. https://redstaryeast.com/yeast-baking-lessons/yeast-activation-temperature/

  • 10+ Easy Dump Cake Recipes for Quick & Delicious Desserts

    10+ Easy Dump Cake Recipes for Quick & Delicious Desserts

    Dump cake recipes are known for their simplicity, typically involving ‘dumping’ a fruit filling or pie filling into a baking dish, covering it with dry cake mix, and topping it with melted butter before baking. This method creates a delicious, cobbler-like dessert with almost no mixing or prep work required.

    We’ve all been there: you get a sudden craving for something sweet, but complex baking steps, endless measuring, and a pile of dirty dishes feel like too much work. Fortunately, there’s a dessert so simple and delicious, it practically makes itself. Meet the humble yet mighty dump cake—the ultimate answer to your dessert dilemmas, perfect for busy home cooks and families alike.

    Dump cakes are exactly what they sound like: you simply “dump” ingredients into a pan and bake. This means no mixing bowls and no intricate techniques, just pure dessert magic. Here at Recipe-GPT, we’ve taken this beloved concept and given it an AI-powered upgrade. Our intelligent system helps you discover personalized dump cake recipes by suggesting variations based on ingredients you have on hand or specific dietary needs, making quick dessert decisions easier than ever.

    Get ready to turn simple pantry staples into show-stopping treats with minimal fuss. In this guide, we’ll explore over ten incredibly easy dump cake recipes, from timeless classics to exciting new flavor combinations. You’ll see what makes dump cakes the go-to quick dessert and how Recipe-GPT can help you craft endless delicious variations.

    What Makes Dump Cake Recipes So Easy?

    Hands pouring fruit pie filling into a baking dish with dry cake mix, illustrating the simplicity of dump cake preparation.
    Professional food photography, photorealistic, high-quality food magazine photo style: A close-up shot in a bright, modern home kitchen, showing a woman’s hands (real human cook, not AI render) gently ‘dumping’ a can of fruit pie filling directly into a baking dish already containing dry cake mix. A stick of butter and a few other simple ingredients are neatly arranged on the clean countertop in the background, out of focus. The scene emphasizes ease and minimal effort. Bright, natural lighting.

    Dump cakes are a game-changer for dessert lovers. True to their name, you simply “dump” the ingredients into a baking dish and bake. It’s a delightfully easy process that takes the stress out of baking, making these treats a favorite for busy cooks everywhere.

    This simple approach is what Recipe-GPT is all about. Our platform focuses on quick and practical recipes, so dump cakes align perfectly with our mission. We help you get delicious, homemade results without the complicated steps or unnecessary effort.

    Simple Ingredients, Simple Prep

    The secret to a dump cake’s ease is its straightforward ingredient list. Most recipes call for just a few common items, and you won’t need any complex culinary tools. This simplicity makes both shopping and prep an absolute breeze.

    • Minimal Items: Often, you only need 3-5 main ingredients.
    • Pantry Staples: Most recipes use items you already have.
    • No Fancy Gear: A baking dish is usually all you need.

    The “Dump and Go” Method

    What truly makes dump cakes revolutionary is the technique. Forget separate mixing bowls, creaming, or folding—you simply layer everything in the pan. Because there’s no extra mess, cleanup is incredibly fast.

    • Layer and Bake: Ingredients are layered directly in the pan.
    • No Mixing Required: The oven does all the work for you.
    • Effortless Assembly: This saves valuable time in the kitchen.

    Forgiving and Flexible

    Dump cakes are incredibly forgiving, which makes them perfect for beginners since it’s tough to make a mistake. Their flexible nature also allows for endless variations, and Recipe-GPT can help you explore new flavor combinations.

    • Beginner-Friendly: Ideal for new cooks building confidence.
    • Hard to Mess Up: Minor adjustments rarely ruin the dessert.
    • Versatile Flavors: Easily swap fruits or cake mixes.

    This inherent ease is what makes dump cake recipes so popular, and Recipe-GPT takes that simplicity even further. Our platform provides instant, AI-generated suggestions, so you can quickly discover personalized variations. Enjoy a delicious, stress-free dessert tonight!

    Our Top 10 AI-Powered Dump Cake Recipes

    A freshly baked, warm dump cake with a scoop of melting vanilla ice cream on a slice, presented on a wooden board.
    Professional food photography, photorealistic, high-quality food magazine photo style: A perfectly baked, warm dump cake, golden brown and bubbly, presented on a rustic wooden board. A slice has been removed, revealing the moist fruit and cake layers. A dollop of melting vanilla ice cream sits on top of the slice. The background is softly blurred, hinting at a cozy home dining setting. Excellent lighting, steam subtly rising from the cake, focus on delicious texture.

    The Original Cherry Dump Cake

    This classic dessert is the ultimate easy treat. Simply “dump” the ingredients into a pan to create a warm, bubbly cherry filling with a tender cake topping. This recipe proves that delicious can be simple.

    Need to make a change? Recipe-GPT can instantly suggest a gluten-free cake mix or a sugar-free cherry pie filling to accommodate any dietary needs. Get tailored ideas in seconds.

    • Key Ingredients: Cherry pie filling, yellow cake mix, butter.
    • AI Help: Get ingredient swaps or adjust serving sizes effortlessly.

    Classic Peach Dump Cake

    Enjoy the sweet taste of summer with this simple peach dump cake, which combines juicy peaches with a golden cake topping. Perfect for any occasion, this dessert takes minimal effort to prepare.

    Have fresh peaches instead of canned? Recipe-GPT can generate precise instructions for the swap. You can also explore additions like a hint of cinnamon or nutmeg, making customization simple.

    • Key Ingredients: Peach pie filling, yellow cake mix, butter.
    • AI Help: Convert fresh fruit measurements or suggest complementary spices.

    Decadent Chocolate Dump Cake

    Indulge your cravings with this rich and easy chocolate dump cake. Featuring a fudgy chocolate base and a moist cake topping, it’s a perfect treat for any chocolate lover. It delivers a gourmet experience but only takes minutes to assemble.

    Want to make it even more decadent? Ask Recipe-GPT for flavor-boosting ingredients like chocolate chips or a swirl of peanut butter. You can also request a less-sweet version for personalized perfection, fast.

    • Key Ingredients: Chocolate fudge cake mix, chocolate pudding mix, milk, butter.
    • AI Help: Suggest flavor enhancements or adjust for sweetness preferences.

    Creamy Cheesecake Dump Cake

    Experience the luxurious taste of cheesecake in a fraction of the time. This creamy dump cake offers a delightful texture and rich flavor, making it a fantastic and incredibly easy choice when you want something special.

    Experiment with fruit toppings using our AI, which might suggest raspberry or blueberry swirls. You can also ask for ingredient substitutions, like low-fat cream cheese. Recipe-GPT provides quick answers to all your baking questions.

    • Key Ingredients: Cream cheese, sugar, eggs, vanilla, yellow cake mix, butter.
    • AI Help: Suggest fruit pairings or provide ingredient alternatives.

    Simple Strawberry Dump Cake

    Bright, fruity, and always a crowd-pleaser, this strawberry dump cake blends sweet strawberries with a light cake layer. It’s an ideal dessert for spring and summer gatherings because it’s so quick to put together.

    Working with frozen strawberries? Recipe-GPT can adapt the recipe instantly. Ask for ideas to add brightness, like a touch of lemon zest, or find ways to match the recipe to what’s in your pantry. Enjoy fast, tailored results.

    • Key Ingredients: Strawberry pie filling, white cake mix, butter.
    • AI Help: Adapt for fresh or frozen fruit, or suggest flavor additions.

    Autumnal Pumpkin Dump Cake

    Embrace the cozy flavors of fall with this pumpkin dump cake. It features a spiced pumpkin base and a buttery, crumbly cake topping that brings warmth and comfort to your table.

    Prefer extra spice? Ask Recipe-GPT to increase the cinnamon or add a touch of ginger. You can also get serving suggestions, like a dollop of whipped cream or ice cream, to create your perfect seasonal treat.

    • Key Ingredients: Pumpkin puree, pumpkin pie spice, evaporated milk, yellow cake mix, butter.
    • AI Help: Adjust spice levels or suggest serving accompaniments.

    The Ultimate 3-Ingredient Dump Cake

    Sometimes, less truly is more, and this 3-ingredient dump cake is delicious proof. Incredibly simple to make, it’s the perfect solution for last-minute dessert cravings. You can’t beat the ease of this recipe.

    Let Recipe-GPT help you explore endless combinations. Ask for suggestions on different fruit fillings and cake mixes. Want to try pineapple with coconut, or apple with spice? Our AI provides instant creative inspiration for new flavor pairings.

    • Key Ingredients: Fruit pie filling, dry cake mix, butter.
    • AI Help: Suggest creative fruit and cake mix pairings for new flavors.

    Apple Cinnamon Dump Cake

    Enjoy a classic combination with this comforting apple cinnamon dump cake. Featuring tender apples baked under a golden, spiced cake layer, this dessert is like a warm hug—ideal for family dinners or a cozy evening.

    Looking for a healthier twist? Recipe-GPT can suggest reducing the sugar or using whole wheat flour. It can also recommend adding chopped nuts for texture, providing practical guidance that simplifies your decisions.

    • Key Ingredients: Apple pie filling, yellow cake mix, cinnamon, butter.
    • AI Help: Offer healthier ingredient swaps or suggest textural additions.

    Blueberry Lemon Dump Cake

    Brighten your day with this zesty blueberry lemon dump cake. Bursting with fresh flavor, it perfectly balances tart lemon and sweet blueberries under a light cake topping.

    Recipe-GPT makes it easy to personalize this recipe. Ask how to adjust the tartness with more lemon zest or get suggestions for a different berry if blueberries are unavailable. Get the confidence you need to adapt any dish.

    • Key Ingredients: Blueberry pie filling, lemon cake mix, butter.
    • AI Help: Adjust lemon intensity or suggest alternative berries.

    Pineapple Coconut Dump Cake

    Escape to a tropical paradise with this delightful pineapple coconut dump cake. Combining juicy pineapple and toasted coconut, this wonderfully flavorful dessert is a taste of vacation in every bite.

    Using sweetened or unsweetened coconut flakes? Recipe-GPT can adjust the recipe accordingly. It can also suggest adding macadamia nuts for extra crunch, helping you get creative with your pantry items. Think of our AI as your smart cooking companion.

    • Key Ingredients: Crushed pineapple, coconut flakes, yellow cake mix, butter.
    • AI Help: Adjust recipes based on specific ingredient types or suggest tropical additions.

    How to Use AI for Endless Dump Cake Variations

    A home cook smiling while interacting with a tablet displaying an AI recipe generation interface for personalized dump cake variations in a kitchen.
    Professional food photography, photorealistic, high-quality food magazine photo style: A cheerful home cook (real human woman, not AI render) is smiling, looking at a tablet displaying a user-friendly AI recipe generation interface, open in a clean and well-lit home kitchen. Her hands are gently resting on the tablet, which shows text about ‘personalized dump cake variations’. In the soft-focus background, basic baking ingredients or a partially prepared dish are visible, suggesting activity. The focus is on the seamless integration of technology in everyday cooking. Warm, inviting lighting.

    Swap Ingredients with AI Suggestions

    Ever started a recipe only to realize you’re missing a key ingredient? Recipe-GPT makes cooking more flexible by helping you easily swap ingredients in your favorite dump cake recipes.

    This feature lets you use what’s already in your pantry, saving a trip to the store. You can also tailor recipes to your family’s tastes or dietary needs.

    Here’s how AI can help you make smart ingredient swaps:

    • Fruit Filling Alternatives: Don’t have cherry pie filling? The AI can suggest alternatives like blueberry, peach, or apple.
    • Cake Mix Varieties: Swap yellow cake mix for vanilla, spice, or chocolate. The AI suggests pairings that taste great together.
    • Flavor Enhancers: Need a nut-free option? The AI can recommend swapping pecans or walnuts for toasted oats or sunflower seeds.
    • Dairy Swaps: For a dairy-free version, ask for swaps like using coconut oil instead of butter or finding a plant-based cake mix.

    Just tell Recipe-GPT what you have, and it will instantly provide delicious, practical substitutions. This makes cooking dump cakes simpler and more convenient.

    Generate Custom Flavor Combinations

    Dump cakes are incredibly versatile, and Recipe-GPT helps you explore endless flavor possibilities. Our AI acts as your personal recipe creator, generating unique combinations based on your tastes.

    Craving something new? Simply describe your ideal dessert, and the AI will offer creative dump cake ideas. You get fresh inspiration without the guesswork.

    Consider these exciting ways to create custom dump cake flavors:

    • Tell Your Preferences: Type in your favorite flavors, like “tropical” or “chocolate and mint,” and the AI will suggest combinations of fruit fillings and cake mixes.
    • Seasonal Inspirations: Ask for seasonal ideas, such as an “autumnal dump cake with pumpkin” or a “summer berry dump cake.”
    • Cuisine-Inspired Twists: Explore different culinary influences by trying a “chai spice dump cake” or a “Mexican chocolate dump cake.”
    • Ingredient-Based Creativity: Use a specific ingredient as your starting point. For example, “create a dump cake using cream cheese and pecans.”

    Recipe-GPT transforms your ideas into clear, step-by-step instructions, making personalized dessert creation fast and fun. Enjoy a unique treat tailored just for you!

    Get Tips for Different Pan Sizes

    Baking can be tricky when a recipe doesn’t match your pan size. Recipe-GPT simplifies this challenge by adjusting dump cake recipes for various pans, ensuring perfect results every time.

    Whether you’re baking for a crowd or just a few, the AI offers practical guidance to scale ingredients correctly, giving you more confidence in the kitchen. Scaling recipes accurately can also lead to less food waste [1].

    Here’s how Recipe-GPT assists with pan size adjustments:

    • Adjusting for Smaller Pans: If a recipe calls for a 9×13-inch pan, ask the AI to adapt it for an 8×8-inch pan. It will suggest how to reduce the ingredient amounts.
    • Scaling for Larger Batches: Need more servings? Ask the AI to double a recipe for a larger crowd, and it will provide the updated ingredient quantities.
    • Unique Bakeware: Want to use a Bundt pan or individual ramekins? The AI can offer guidance on adjusting butter, cake mix, and filling amounts.
    • Baking Time Guidance: Different pan sizes often require different baking times. The AI provides estimated cooking durations for your specific pan.

    Just ask Recipe-GPT to adapt your dump cake recipe, and it will quickly deliver adjusted instructions to ensure your dessert turns out perfectly every time.

    Frequently Asked Questions About Dump Cakes

    What is the original dump cake recipe?

    The original dump cake recipe is famously simple. The recipe emerged in the 1960s, when convenience cooking was on the rise. The idea was to “dump” ingredients into a pan with minimal fuss.

    Typically, it involves:

    • A can of fruit pie filling (like cherry or peach) as the base.
    • A box of dry cake mix, usually yellow or white, sprinkled over the fruit.
    • Melted butter or pats of butter placed on top of the cake mix.

    No stirring is required before baking! This method creates a dessert with a gooey, fruit-filled bottom and a cake-like, slightly crisp topping. Food historians often credit brands like Duncan Hines for popularizing this easy dessert concept [2].

    Recipe-GPT can help you explore modern twists on this classic. Just ask our AI for “original dump cake variations” to get started!

    What do I need for a 3-ingredient dump cake?

    A true 3-ingredient dump cake is as straightforward as it sounds, making it perfect for busy evenings or a last-minute dessert. You only need these three items:

    1. One can of fruit pie filling: Cherry, peach, apple, or blueberry are popular choices.
    2. One box of dry cake mix: Yellow or white cake mix works best for most fruit fillings.
    3. One stick (1/2 cup) of butter: This can be melted or cut into small pats.

    To prepare it, spread the pie filling in your baking dish. Sprinkle the dry cake mix evenly over the fruit. Finally, pour the melted butter over the top or dot it with butter pats. Bake until golden and bubbly!

    With Recipe-GPT, you can easily find new flavor combinations for your 3-ingredient dump cake. Ask for “3-ingredient dump cake with tropical fruit” for a fun twist!

    Which cake mix is best for dump cake recipes?

    The “best” cake mix depends on your chosen fruit filling and personal preference. However, certain types are exceptionally well-suited for dump cakes:

    • Yellow Cake Mix: This is a versatile classic. Its rich, buttery flavor complements almost any fruit, from cherries to pineapples.
    • White Cake Mix: A lighter option, white cake mix allows the fruit flavors to shine. It’s great with brighter fruits like strawberries or blueberries.
    • Chocolate Cake Mix: This is an excellent choice for pairings with dark cherries, raspberries, or even a can of caramel topping for a decadent treat.
    • Spice Cake Mix: Ideal for fall-themed dump cakes, this mix pairs perfectly with pumpkin, apple, or pear fillings.
    • Lemon Cake Mix: For a zesty touch, try lemon cake mix with blueberry, raspberry, or peach pie filling.

    Consider the flavor profile you want to achieve. A plain cake mix highlights the fruit, while a flavored mix adds another layer of complexity. Recipe-GPT can suggest the perfect cake mix based on the fruit you have on hand. Just tell our AI your ingredients, and we’ll create personalized dump cake ideas!

    What’s the difference between a dump cake and a cobbler?

    While dump cakes and cobblers are both delicious fruit desserts, they have key differences in their topping and preparation.

    Feature Dump Cake Cobbler
    Topping Base Dry boxed cake mix Biscuit, scone, or cookie-like dough
    Preparation Ingredients are “dumped” and layered without pre-mixing the topping. Fruit is often sweetened, then topped with spoonfuls or layers of prepared dough.
    Topping Texture Crumbly and cake-like, sometimes slightly crisp where butter melts. Soft and tender, with a more defined biscuit or doughy texture.
    Key Characteristic Ultimate simplicity and minimal effort. Often involves making a simple dough from scratch or a mix.

    Both desserts deliver warm, comforting fruit flavors. Dump cakes are known for their extreme ease, while cobblers offer a more traditional, home-baked topping. Recipe-GPT can help you explore both! Simply ask our AI for “easy cobbler recipes” or “quick dump cake ideas” for instant inspiration.


    Sources

    1. https://www.epa.gov/recycle/reducing-wasted-food-home
    2. https://www.duncanhines.com/
  • The Ultimate Cherry Pie Recipe: A Simple Step-by-Step Guide

    The Ultimate Cherry Pie Recipe: A Simple Step-by-Step Guide

    The best cherry pie recipe features a rich, sweet-tart filling made from fresh, frozen, or canned cherries, balanced with sugar and a thickener like cornstarch. It’s encased in a flaky, all-butter crust that bakes to a perfect golden brown, creating the ultimate classic American dessert.

    There’s nothing quite like the comforting taste of a homemade cherry pie. The perfect blend of sweet and tart cherries in a golden, flaky crust is pure culinary magic. Yet, the idea of baking a pie from scratch can seem intimidating. Many home cooks crave that classic dessert without the stress of a complicated process.

    Good news: you’ve found the solution. This guide is dedicated to what we consider the best cherry pie recipe because it’s designed to be simple, straightforward, and incredibly satisfying. We’ll walk you through every step to ensure you achieve a flawless pie every single time. This recipe works beautifully with fresh, frozen, or even canned cherries, making it perfect for bakers of all skill levels.

    At Recipe-GPT, our goal is to simplify mealtime decisions, and that includes delightful desserts. While we focus on this classic, remember our AI tools can help personalize your baking. For instance, they can provide quick dietary adjustments or smart ingredient substitutions tailored just for you. Now, get ready to bake an unforgettable cherry pie with confidence.

    Why Is This the Best Cherry Pie Recipe?

    Ready to bake the best cherry pie recipe you’ve ever tried? We combine timeless techniques with modern AI assistance to ensure you get perfect results. This isn’t just another recipe; it’s a completely new baking experience.

    Our recipe creates a perfect balance, featuring a flaky, buttery crust and a delicious sweet-tart cherry filling. It’s the classic flavor you love, perfected for your home kitchen.

    But what makes this recipe truly stand out? It’s more than just the ingredients; it’s how Recipe-GPT personalizes the experience for you. We believe baking should be inspiring and easy, so our AI is here to guide you every step of the way.

    Here’s why this recipe, powered by Recipe-GPT, stands out:

    • Perfect Flavor Balance: Our recipe consistently delivers the ideal sweet-tart taste that makes a cherry pie unforgettable.
    • Flaky, Foolproof Crust: Follow our straightforward instructions for an all-butter crust that comes out golden and flaky every time.
    • Beginner-Friendly Approach: Each step is clear and simple, so even new bakers can achieve amazing results.
    • AI-Powered Customization: Recipe-GPT helps you personalize the recipe. For example, you can easily adjust for dietary needs or ingredient availability.
    • Quick & Practical Guidance: We focus on efficiency, helping you get delicious results without unnecessary fuss.
    • Confidence in Every Slice: Say goodbye to baking stress. Our guide ensures you bake with ease and confidence.

    Turn baking uncertainty into confident success. This recipe moves beyond generic instructions to offer a tailored, delightful experience. Our AI makes sure this isn’t just the “best” recipe, but the best recipe for *you*. You’ll create a show-stopping cherry pie with ease and joy, making this the most accessible and rewarding cherry pie recipe you can find.

    What Ingredients Do You Need for Cherry Pie?

    A beautifully arranged flat lay of fresh cherries, flour, butter, sugar, and spices on a light wooden surface, ready for making pie.
    Professional food photography, photorealistic, high-quality food magazine photo style. A meticulously arranged flat lay of fresh, vibrant ingredients for a cherry pie on a rustic, light-colored wooden culinary workspace. Ingredients include a bowl of glistening, dark red fresh cherries with stems, a mound of all-purpose flour, a stick of cold butter, granulated sugar, cornstarch, almond extract, and a sprinkle of cinnamon and nutmeg. Natural soft lighting, shallow depth of field, bright and clean composition, inviting and clear.

    Crafting the perfect cherry pie starts with the right ingredients. Recipe-GPT makes this process simple and stress-free by helping you decide exactly what you need. Our AI can even suggest adjustments based on ingredients you already have, ensuring your pie is delicious every time.

    For the Perfect Pie Crust

    A flaky, tender crust is essential for any great cherry pie. These key ingredients each play a crucial role in creating that irresistible texture.

    • All-Purpose Flour: This provides the structure for your crust.
    • Unsalted Butter: Keeping the butter very cold is key to creating beautiful, flaky layers.
    • Ice Water: This binds the dough while keeping the butter firm for maximum flakiness.
    • Granulated Sugar: A touch of sugar adds a subtle sweetness to the crust.
    • Salt: Just a pinch enhances all the other flavors.

    Whether you need a gluten-free or vegan option, Recipe-GPT can instantly generate a personalized ingredient list. Our AI takes your dietary needs and preferences into account, making substitutions simple.

    For the Sweet & Tart Cherry Filling

    The vibrant cherry filling is the star of the show, offering a delightful balance of sweet and tart. You can easily adjust the sweetness to your liking, and Recipe-GPT can help you work with either fresh or frozen cherries.

    • Cherries: Use fresh or frozen pitted sweet cherries.
    • Granulated Sugar: This balances the cherries’ tartness. Adjust the amount to your taste.
    • Cornstarch: This acts as a thickener, ensuring your filling is perfectly set and not runny.
    • Lemon Juice: A splash brightens the cherry flavor and adds a lovely zest.
    • Almond Extract (Optional): A classic addition that complements cherries beautifully.
    • Salt: A small amount rounds out the flavors.

    Our AI is ready to assist with any modifications. For instance, if you prefer a less sweet pie, Recipe-GPT can suggest precise sugar reductions. It can also recommend different thickeners if cornstarch isn’t available, simplifying your cooking process.

    How to Make the Best Cherry Pie Step-by-Step

    A home cook's hands expertly weaving a lattice crust over a cherry pie filling in a pie dish.
    Professional food photography, photorealistic, high-quality food magazine photo style. A close-up shot capturing the moment a home cook’s hands, with slightly floured fingertips, are carefully weaving the final strips of a golden-brown lattice crust over a vibrant, ruby-red cherry pie filling in a ceramic pie dish. The background shows a clean, warm home kitchen counter with a hint of other baking tools blurred. Focus on the hands and the intricate crust, natural lighting.

    Step 1: Prepare the all-butter pie crust

    A delicious pie starts with the perfect crust. Our all-butter recipe creates a flaky, tender base for the cherry filling, and it’s simpler to make than you might think.

    To customize this recipe, use Recipe-GPT. Our AI can create a personalized variation in seconds, such as a gluten-free version, to make your meal planning easier.

    1. Combine Dry Ingredients: In a large bowl, whisk together the flour, sugar, and salt. This ensures they are evenly distributed.
    2. Cut in Cold Butter: Add the cold, cubed butter. Using a pastry blender or your fingertips, cut the butter into the flour until the mixture resembles coarse crumbs with some pea-sized pieces still visible. These pockets of butter are what create the flaky layers.
    3. Add Ice Water Gradually: Drizzle in ice water, one tablespoon at a time, mixing gently after each addition. Stop when the dough just comes together. Avoid overmixing to keep the crust tender.
    4. Divide and Chill: Divide the dough in half and flatten each half into a disk. Wrap each disk tightly in plastic wrap and refrigerate for at least 30 minutes. Chilling is crucial, as it helps the butter firm up and prevents the dough from becoming too sticky to roll.
    5. Roll Out the First Crust: On a lightly floured surface, roll out one disk of dough into a 12-inch circle. Carefully transfer it to a 9-inch pie plate. Trim the edges, leaving a 1/2-inch overhang, and place the pie plate in the fridge while you prepare the filling.

    Step 2: Make the Cherry Pie Filling

    Next, create the vibrant, sweet-tart cherry filling. The key is to balance the fruit’s natural flavor with the right amount of sweetness and a thickener. If you’d like to adjust the sweetness, Recipe-GPT can customize the recipe for you.

    1. Combine Cherries and Sweetener: In a large bowl, combine the fresh or frozen cherries with granulated sugar. If using frozen cherries, there is no need to thaw them first.
    2. Add Flavorings and Thickener: Stir in the lemon juice, vanilla extract, and cornstarch until well combined. The lemon juice brightens the cherry flavor, and the cornstarch thickens the filling as it bakes.
    3. Let it Sit: Allow the mixture to sit for 15-20 minutes. This step draws out the cherry juices and helps the flavors meld together.
    4. Optional Simmer (for extra richness): For a thicker, more developed flavor, transfer the cherry mixture to a saucepan. Cook over medium heat for 5-7 minutes, stirring constantly, until it just begins to thicken. Let it cool completely before using. This step is especially helpful for very juicy cherries.

    Step 3: Assemble Your Pie

    Now it’s time to assemble the pie. These straightforward steps will ensure your pie looks great and is sealed properly to prevent leaks.

    1. Preheat Oven and Prepare Crust: Preheat your oven to 400°F (200°C). Remove the chilled pie plate with the bottom crust from the refrigerator.
    2. Fill the Crust: Pour the prepared cherry filling into the bottom crust and spread it evenly.
    3. Add Top Crust: Roll out the second disk of dough. You can place it over the filling as a solid top crust or cut it into strips for a lattice design. If using a solid top, cut a few slits in the center to allow steam to escape.
    4. Seal the Edges: Place the top crust over the filling. Trim any excess dough, then crimp the edges to seal them. You can use your fingers or a fork to create a decorative edge. This prevents the filling from bubbling out during baking.
    5. Egg Wash (Optional): For a golden, shiny crust, brush the top with an egg wash (one egg yolk beaten with a tablespoon of water).

    Step 4: Bake to Golden Perfection

    The final step is baking. Following these guidelines will give you a bubbly, thick filling and a perfectly crisp, golden-brown crust.

    1. Start Hot: Place the pie on a baking sheet to catch any drips and bake for 15 minutes at 400°F (200°C). This initial high heat helps set the crust and starts thickening the filling. Many bakers agree this high-heat start is key to preventing a soggy bottom [1].
    2. Reduce Heat and Continue Baking: After 15 minutes, reduce the oven temperature to 375°F (190°C). Continue baking for another 45-55 minutes.
    3. Check for Doneness: The pie is done when the crust is deeply golden brown and the filling is thick and bubbly. If the crust starts to brown too quickly, loosely cover the edges with aluminum foil.
    4. Cool Completely: This step is crucial! Let the pie cool completely on a wire rack for at least 3-4 hours. Cooling allows the filling to set, which ensures you can cut clean, non-runny slices.

    How Can AI Help Personalize Your Cherry Pie?

    Adjusting for Dietary Needs

    Crafting the perfect cherry pie often means catering to specific diets, but adapting a classic recipe can be tricky. Recipe-GPT makes this easy by taking your dietary needs into account.

    Our AI understands common restrictions and quickly reworks the ingredients for you. The result is less stress and a more delicious pie.

    Consider these common dietary adjustments for your cherry pie:

    • Vegan-Friendly: Replace butter with plant-based shortening or vegan butter in the crust. Use a cornstarch slurry instead of egg wash for glazing.
    • Gluten-Free: Opt for a pre-made gluten-free pie crust. Alternatively, our AI can generate a homemade gluten-free crust recipe using specialized flours.
    • Low-Sugar: Reduce the amount of sugar in the filling. Use a natural sweetener like erythritol or stevia for a healthier option. Recipe-GPT can calculate the exact amounts.
    • Nut-Free: Ensure all ingredients are free from nuts. This is crucial for allergy sufferers.

    Recipe-GPT instantly provides tailored guidance, so you get a personalized cherry pie recipe every time. Enjoy a pie that you know fits your lifestyle.

    Finding Ingredient Substitutions

    Ever started baking only to realize you’re missing a key ingredient? Recipe-GPT helps you avoid that last-minute dash to the store by suggesting smart substitutions.

    It helps you use what you already have, saving both time and money. Simply tell Recipe-GPT what’s missing, and it will offer practical alternatives.

    Here are some ways Recipe-GPT can help with substitutions:

    • Fruit Variations: No fresh cherries? Ask for a recipe using frozen cherries, canned cherries, or even a different fruit like mixed berries or apples.
    • Crust Alternatives: If you’re short on time for a homemade crust, Recipe-GPT can suggest using a store-bought crust. It can also suggest a graham cracker or cookie crust for a different twist.
    • Sweetener Swaps: Out of granulated sugar? Our AI can suggest using brown sugar, honey, or maple syrup. It also advises on adjusting liquid content if needed.
    • Thickener Changes: If you don’t have cornstarch, Recipe-GPT can recommend flour or tapioca starch. It will guide you on the correct quantities for a perfectly thick filling.

    Recipe-GPT makes cooking flexible and fun by providing instant, practical solutions. You can confidently create your cherry pie with the ingredients you have on hand.

    Tips for a Flawless Cherry Pie Every Time

    A freshly baked cherry pie with a golden lattice crust, served with a scoop of melting vanilla ice cream on a white plate.
    Professional food photography, photorealistic, high-quality food magazine photo style. A perfectly baked, whole cherry pie with a beautifully golden-brown, intricately woven lattice top, showcasing a slight bubbling of the cherry filling peeking through. The pie is presented warm on a simple white ceramic plate, with a large scoop of creamy vanilla bean ice cream gently melting on one side. The setting is a cozy, inviting home kitchen table, with a soft, blurred background. Warm, natural lighting, rich colors, appealing texture, inviting and delicious presentation.

    How to Prevent a Soggy Bottom

    A soggy pie bottom is a common baking challenge, but you can achieve a wonderfully crisp crust every time. These simple tricks make all the difference.

    Recipe-GPT can even suggest specific methods for your ingredients. It can personalize advice based on the type of flour or fat you use.

    • Blind Bake Your Crust: This is a crucial first step. Blind baking partially cooks the crust before you add the filling, creating a barrier against moisture.
    • Egg Wash the Crust: After blind baking, brush a thin layer of beaten egg white onto the crust and bake for a few more minutes until set. This creates a waterproof seal.
    • Use a Hot Baking Surface: Place your pie on a preheated baking sheet or pizza stone. This delivers immediate, intense heat to the bottom of the crust, helping it crisp up.
    • Thicken Your Filling Properly: Make sure your cherry pie filling isn’t too watery. Use a thickener like cornstarch or tapioca to get the right consistency. Recipe-GPT can suggest the perfect amount to use.
    • Aluminum Foil Shield: If the top of your pie browns too quickly, loosely tent it with foil. This protects the edges and allows the bottom to cook through completely.

    By following these steps, you will enjoy a firm, flaky base. Say goodbye to soggy pie crusts forever!

    Getting the Perfect Lattice Top

    A beautiful lattice top doesn’t just look impressive—it’s also functional. It allows steam to escape, which helps prevent the filling from bursting.

    Don’t worry if you’re a beginner. Recipe-GPT can provide easy, visual instructions for crafting a perfect lattice. It makes complex techniques simple to follow.

    • Chill Your Dough: Cold pie dough is much easier to handle and less likely to stick or tear. For best results, chill your rolled-out dough strips for 10-15 minutes before weaving.
    • Cut Even Strips: For a neat, professional-looking weave, use a ruler and a pastry wheel or knife to cut strips of uniform width.
    • Lay the Foundation: To start, lay half of your dough strips parallel to each other across the pie filling, leaving a small space between each one.
    • Begin Weaving: Fold back every other parallel strip. Lay a new strip perpendicularly across the strips you didn’t fold. Then, unfold the strips you folded back over the new one.
    • Continue the Pattern: Next, fold back the alternate set of parallel strips. Add another perpendicular strip and repeat this pattern until the entire pie is covered.
    • Trim and Crimp: Once the lattice is complete, trim any excess dough from the edges. Crimp the edges to firmly seal the lattice to the bottom crust.
    • Egg Wash and Sugar: For a professional finish, brush the lattice with an egg wash for a golden sheen. A sprinkle of coarse sugar also adds a delightful sparkle and crunch.

    A stunning lattice top is within your reach. Impress your family and friends with this classic finish.

    Storing Your Cherry Pie

    Proper storage is key to keeping your delicious cherry pie fresh and safe to eat.

    Recipe-GPT can even offer ideas for using up leftover pie. It might suggest a breakfast parfait or a deconstructed dessert!

    • Cool Completely: First, always let your pie cool fully before storing it. A warm pie creates condensation, which leads to a soggy crust.
    • Room Temperature (Short-Term): Fruit pies with high sugar content, like cherry, can be stored at room temperature for up to two days. Simply keep it loosely covered with foil or plastic wrap.
    • Refrigeration (Longer-Term): If you need to store the pie for longer, or if your kitchen is warm, place it in the refrigerator. Covered tightly, it will stay fresh for up to four days.
    • Freezing for Later: To freeze a whole pie, wrap it tightly in plastic wrap, then in a layer of foil. It can be frozen for up to 3 months [2]. Thaw it overnight in the refrigerator and reheat in a 350°F (175°C) oven until warmed through.
    • Individual Slices: For leftover slices, store them in an airtight container. This helps maintain freshness and prevents the pie from absorbing odors from other foods.

    Enjoy your homemade cherry pie for days to come. Recipe-GPT helps you make the most of every delicious creation.

    Frequently Asked Questions

    What is the best cherry pie recipe with canned cherries?

    Using canned cherries is a fantastic shortcut for a quick and delicious pie. This simple swap saves you time, especially on busy weeknights. Recipe-GPT can also help you tailor recipes to pantry staples like canned fruit.

    To make a great pie with canned cherries, follow these simple steps:

    • Drain well: First, drain the canned cherries thoroughly. You can reserve some of the juice to adjust the filling’s consistency later.
    • Adjust sweetness: Canned cherries often come in a sweet syrup, so you’ll need less sugar than with fresh cherries. Taste them first, then add sugar gradually until you reach your desired sweetness.
    • Thicken: To thicken the filling, mix cornstarch or flour with a little reserved cherry juice or water to create a slurry. Stir this into your drained cherries, and it will thicken as the pie bakes.
    • Flavor boost: A touch of almond extract or vanilla can enhance the cherry flavor. A pinch of cinnamon or nutmeg also works wonderfully.
    • Use your crust: Pour the prepared filling into your favorite pie crust and bake as directed for a classic cherry pie.

    For more variations, Recipe-GPT can help. Just state that you have canned cherries, and it will suggest precise measurements and flavor combinations, making your pie-making process easy.

    What is the best cherry pie recipe from scratch?

    For the best results, our featured “Ultimate Cherry Pie Recipe” is the top choice for a scratch-made pie. Making a pie from scratch offers unparalleled freshness and flavor, as you control every ingredient to ensure a perfect balance of sweet and tart.

    The key to a top-tier scratch pie involves two main components:

    • Homemade crust: An all-butter pie crust offers a flaky texture and rich flavor. The extra effort is worth it for a superior pie experience.
    • Fresh cherry filling: Using fresh, ripe cherries ensures the most vibrant taste. This also allows you to tailor the sugar and thickener to your exact preference.

    Our step-by-step guide walks you through the entire process. For example, using fresh fruit ensures a brighter, more natural cherry flavor [3]. If you’re out of a specific ingredient, Recipe-GPT can instantly suggest clever substitutions for your crust or filling, helping you bake from scratch with confidence.

    How do you make an old fashioned cherry pie recipe?

    An old-fashioned cherry pie highlights classic, simple flavors and traditional techniques. The goal is to let the natural taste of the cherries shine through without any fancy additions or complicated steps.

    To capture that nostalgic “old-fashioned” feel:

    • Simple ingredients: Stick to basic filling ingredients. Fresh or frozen cherries, sugar, a thickener like cornstarch or flour, and a hint of almond extract or vanilla are all you need.
    • Classic double crust: Most old-fashioned pies feature a full top crust, not just a lattice. This seals in moisture and helps create a lovely golden-brown finish.
    • Balanced sweetness: Aim for a perfect balance between the cherries’ natural tartness and the added sugar. Adjust to your taste, but avoid making it overly sweet.
    • Gentle baking: Bake slowly until the crust is golden and the filling is bubbly. This method ensures even cooking and a tender crust.

    Recipe-GPT can help you explore “old-fashioned” variations. Simply ask for a traditional cherry pie, and it will provide straightforward, authentic guidance. It makes rediscovering classic recipes easy and fun.

    What’s the best way to make a cherry pie filling recipe?

    The secret to the best cherry pie filling is balancing flavors and achieving the right consistency. A great filling is sweet yet tart with a thick, glossy texture that isn’t too runny or stiff.

    Here’s how to make a truly outstanding filling:

    • Choose your cherries: Fresh sour cherries are ideal for a classic flavor. If you use sweet cherries, you should reduce the sugar. Frozen cherries also work well; just thaw and drain them first.
    • Balance flavors: Combine sugar with the cherries. A touch of lemon juice will brighten the flavor, while almond extract or vanilla adds depth and complexity.
    • Thicken correctly: Use an excellent thickener like cornstarch or tapioca starch. To prevent lumps and ensure a smooth consistency, mix it thoroughly with the fruit and sugar before cooking.
    • Cook gently: Simmer the filling on the stovetop, stirring constantly to prevent sticking, until it thickens and becomes glossy. The mixture should bubble for a minute or two to fully activate the thickener.
    • Cool completely: Always let the filling cool completely before pouring it into your pie crust. This step is crucial for preventing a soggy bottom and helping the pie set beautifully.

    Recipe-GPT is your go-to for customizing fillings. Whether you need a low-sugar option, want to use different spices, or need to adapt for a specific cherry type, our AI can instantly provide personalized, step-by-step instructions. This makes exploring new variations simple and stress-free.


    Sources

    1. https://www.kingarthurbaking.com/blog/2016/08/17/prevent-soggy-pie-crust
    2. https://www.npr.org/sections/thesalt/2014/11/20/365518153/the-science-of-pie-how-to-avoid-common-baking-mistakes
    3. https://www.foodandwine.com/desserts/pie/cherry-pie-recipes

  • The Only Recipe for Muffins You’ll Ever Need: A Simple How-To Guide

    The Only Recipe for Muffins You’ll Ever Need: A Simple How-To Guide

    A basic recipe for muffins is a simple quick bread made by combining wet ingredients (like milk, eggs, and oil or butter) with dry ingredients (flour, sugar, salt, and a leavening agent like baking powder). The batter is mixed minimally to ensure a tender texture and can be customized with various additions like fruit, nuts, or chocolate chips.

    Who doesn’t love a warm, fluffy muffin fresh from the oven? While baking homemade treats is delightful, finding a truly easy and foolproof recipe can be a challenge. You need something that’s simple, quick, and guarantees delicious results. Your search is over. This guide introduces the only basic muffin recipe you’ll ever need, designed for simplicity and success.

    Our simple muffin recipe takes the guesswork out of baking, making it perfect for first-time bakers and busy parents alike. It guarantees moist, tender muffins every single time. We walk you through each step to make homemade baking approachable and fun. But this classic recipe is just the start. With Recipe-GPT, you can unlock endless variations and personal tweaks.

    Once you master this foundational recipe, we’ll show you how Recipe-GPT’s AI can transform it into countless personalized creations. Get instant ideas for ingredient swaps, dietary adjustments, or new flavor combinations—all to make your baking easy and exciting. Get ready to bake with confidence, customize your treats, and see why this is the only muffin recipe you’ll ever need.

    Why Is This the Best Muffin Recipe for Beginners?

    Starting your baking journey can feel daunting, but this muffin recipe is a game-changer for beginners. It’s designed to remove the guesswork and ensure a delicious outcome every time.

    Think of this recipe as your first step toward baking confidence. We call it the best for beginners because it simplifies the entire process, from gathering ingredients to pulling your muffins out of the oven.

    Why This Recipe is Perfect for New Bakers

    • Common Pantry Ingredients: No need to hunt for exotic items. This recipe uses staples you likely already have, like flour, sugar, eggs, and milk.
    • Super Straightforward Steps: The method couldn’t be simpler. Just combine wet ingredients in one bowl and dry in another, then gently mix them together—no complex techniques required.
    • Quick to Prepare: You can mix and bake these homemade muffins in under 30 minutes, making them ideal for busy families and quick snacks.
    • Very Forgiving: As a forgiving bake, muffins are hard to mess up. Small mistakes rarely ruin the batch, which helps build confidence and reduce baking anxiety.
    • Easily Customizable: Once you master the base recipe, the variations are endless. Our AI tool, Recipe-GPT, makes it simple to explore new ideas by providing personalized suggestions based on your preferences or available ingredients.

    Recipe-GPT acts as your knowledgeable cooking companion, helping you move from uncertainty to enjoyment in the kitchen. It offers quick, practical suggestions tailored just for you, turning mealtime indecision into clear, personalized options.

    With a foundation this simple and forgiving, you’ll gain the confidence to try new things. Start here, and you’ll see why this is one of the best muffin recipes to begin your baking journey.

    What Ingredients Do You Need for a Basic Muffin Recipe?

    A flat lay photo of basic muffin ingredients including flour, sugar, eggs, milk, butter, and blueberries, laid out on a kitchen counter.
    Professional food photography, photorealistic, high-quality food magazine photo style. A beautifully arranged flat lay of all basic muffin ingredients on a clean, light wooden kitchen counter. Ingredients include white flour in a bowl, granulated sugar, whole eggs, a carton of fresh milk, sticks of butter, a small bowl of baking powder, and a scattering of fresh blueberries. The composition is clean, well-lit with natural light, and visually appealing, emphasizing freshness and simplicity in a home kitchen culinary workspace.

    Dry Ingredients

    Every great homemade muffin starts with a solid foundation of dry ingredients. These pantry staples are simple to combine and provide the essential structure for your recipe.

    First, gather these essentials:

    • All-Purpose Flour: This is the main structure for your muffins. It provides the perfect base for a fluffy texture.
    • Granulated Sugar: Sugar adds sweetness. It also helps with browning and moisture.
    • Baking Powder: This leavening agent makes your muffins rise and gives them that classic domed top.
    • Salt: A pinch of salt enhances all the flavors and balances the sweetness beautifully.

    Need a substitution? Recipe-GPT can instantly suggest alternatives like gluten-free flour blends or lower-sugar options. Our AI makes it easy to personalize your muffin recipe based on your dietary needs.

    Wet Ingredients

    Next, you’ll need wet ingredients to add moisture, richness, and bind everything together. These components are key to ensuring your muffins are incredibly tender and moist.

    You will need the following:

    • Milk: Any type of milk works well. It adds moisture and helps create a soft crumb.
    • Large Egg: An egg acts as a binder, helping to hold your muffins together while adding richness.
    • Vegetable Oil (or Melted Butter): This provides essential moisture to keep your muffins wonderfully tender. Using oil is a simple way to guarantee a soft texture.
    • Vanilla Extract: A touch of vanilla adds warmth and depth of flavor that complements the other ingredients.

    If you’re missing an ingredient, our AI-powered Recipe-GPT can help. It can suggest smart substitutes based on what you have on hand, like using almond milk for a dairy-free option or applesauce instead of oil. This tool helps you create the perfect muffin recipe tailored to your pantry.

    How to Make Simple Homemade Muffins Step-by-Step

    Hands gently folding wet and dry ingredients together in a large glass mixing bowl to create muffin batter.
    Professional food photography, photorealistic, high-quality food magazine photo style. A close-up shot of a real home cook’s hands, in a well-lit, clean modern home kitchen, gently folding wet muffin batter into dry ingredients in a large, clear glass mixing bowl using a silicone spatula. The batter has a light, fluffy consistency. The focus is sharp on the mixing action and the texture of the ingredients, with a softly blurred background showing a tidy culinary workspace. The scene conveys ease and approachability.

    Step 1: Preheat and Prepare

    First, preheat your oven to 400°F (200°C). A properly heated oven is key for even baking and perfect muffin tops.

    Next, prepare a 12-cup muffin tin by lining it with paper liners or lightly greasing each cup. This step prevents sticking and makes cleanup a breeze.

    Step 2: Combine the Dry Ingredients

    In a large mixing bowl, whisk together the dry ingredients:

    • All-purpose flour
    • Granulated sugar
    • Baking powder
    • Salt

    Whisking helps distribute the leavening agents evenly, which ensures your muffins rise beautifully. Set this bowl aside.

    Step 3: Mix the Wet Ingredients

    In a separate medium-sized bowl, whisk together all the wet ingredients until they are fully blended:

    • Milk
    • Melted unsalted butter (or vegetable oil)
    • Large egg
    • Vanilla extract

    Ensure the egg is fully incorporated to create a uniform liquid base for your muffins. For dietary adjustments, Recipe-GPT can suggest substitutions, such as recommending dairy-free milk to fit your preferences.

    Step 4: Gently Combine Wet and Dry

    This step is crucial for making tender muffins. Pour the wet mixture into the dry ingredients and gently stir with a spoon or spatula.

    Mix only until the streaks of flour disappear. A few lumps are perfectly fine; overmixing develops too much gluten, which can result in tough, dense muffins. The goal is light and fluffy!

    Recipe-GPT provides clear, actionable steps like this to help beginners avoid common pitfalls, ensuring your homemade muffins turn out great every time.

    Step 5: Fill Muffin Tin and Bake

    Using a spoon or an ice cream scoop, evenly divide the batter among the 12 prepared muffin cups. Fill each cup about two-thirds full.

    Place the muffin tin in the preheated oven and bake for 18-22 minutes. The muffins are done when the tops are golden brown and a toothpick inserted into the center comes out clean.

    Once baked, let the muffins cool in the pan for 5 minutes before transferring them to a wire rack to cool completely. Enjoy your easy muffins fresh! This basic recipe is incredibly satisfying. For new ideas, Recipe-GPT can instantly generate countless personalized flavor variations for your next batch.

    How Can AI Help Personalize Your Muffins?

    Generate Instant Recipe Variations

    A basic muffin recipe is a great start, but what if you crave something different? Recipe-GPT helps you explore endless possibilities.

    Our AI-powered tool creates exciting twists based on your preferences. Just tell it what you like or what ingredients you have on hand.

    • Flavor Combos: Want to try blueberry or chocolate chip? Just ask, and Recipe-GPT will instantly craft a new recipe for you.
    • Dietary Needs: Need a gluten-free or dairy-free version? Our AI can adjust any recipe to fit your needs, making it simple to find suitable options.
    • Ingredient-Driven: Have ripe bananas on your counter? Tell Recipe-GPT, and it will suggest a delicious banana nut muffin recipe.

    Go from a single recipe to a world of personalized ideas. It’s a fast, fun way to make baking feel fresh every time.

    Find Ingredient Substitutions

    Ever start baking, only to realize you’re missing an ingredient? It happens to everyone. Think of Recipe-GPT as your helpful pantry assistant.

    Our AI instantly suggests smart swaps, so you can avoid last-minute trips to the store and keep baking without interruption.

    Get smart swaps for common ingredients, including:

    • Milk Alternatives: Out of cow’s milk? The AI can suggest using almond milk or even plain yogurt.
    • Egg Replacements: If you need an egg-free option, it might suggest flax eggs or applesauce.
    • Flour Swaps: Want to use whole wheat instead of all-purpose flour? Recipe-GPT will guide you through the change.
    • Sweetener Changes: Easily adjust from granulated sugar to honey or maple syrup if desired.

    Bake with confidence, knowing you can use what you have and still get great results. This practical feature prevents food waste and makes baking more convenient.

    Adjust Serving Sizes Instantly

    Baking for one or a crowd? Scaling recipes can be tricky, but Recipe-GPT removes all the guesswork.

    Our AI precisely adjusts ingredient quantities for you, ensuring you get the perfect batch size every time—no complicated math or confusing conversions required.

    Simply tell Recipe-GPT how many servings you need:

    • Small Batch: Need just a few muffins for a quick treat? The AI will reduce ingredients accurately.
    • Family Size: Baking for a busy morning breakfast? Get quantities for a dozen or more.
    • Party Prep: Planning a gathering? Recipe-GPT can effortlessly scale your recipe for a large group.

    This feature saves you time and helps ensure your muffins turn out perfectly, whatever the batch size. Enjoy stress-free baking for any occasion.

    Expert Tips for a Simple Moist Muffin Recipe

    A close-up of a freshly baked, moist muffin, with a piece torn off to show the fluffy interior, resting on a cooling rack.
    Professional food photography, photorealistic, high-quality food magazine photo style. A close-up, warm and inviting shot of a perfectly golden-brown, freshly baked muffin. One muffin is slightly torn open to reveal its moist, fluffy interior, with a gentle wisp of steam rising. It rests on a wire cooling rack in a home kitchen, with a few other perfectly baked muffins blurred in the background. Natural light from a window highlights the texture and inviting warmth of the muffin, showcasing a delicious result.

    Crafting the perfect muffin is easier than you think. With a few expert tips, you can ensure your homemade muffins are consistently moist, fluffy, and delicious.

    Recipe-GPT can even help you master these techniques by offering personalized guidance for your specific needs.

    Key Techniques for Moist Muffins

    These simple techniques are the key to achieving a moist crumb and tender texture, elevating any basic muffin recipe.

    • Don’t Overmix the Batter: This is the most crucial tip for tender muffins. Overmixing develops too much gluten, which makes them tough and chewy. To avoid this, stop mixing as soon as the dry ingredients are incorporated—a few small lumps are perfectly fine.
    • Use Room Temperature Ingredients: Using room temperature ingredients like milk and eggs helps them combine more easily into a smooth, uniform batter. This improved emulsification is what creates a finer, more delicate crumb in the final muffin.
    • Fill Muffin Liners Correctly: To get beautifully domed tops, fill each muffin liner about two-thirds full. This gives the batter enough space to rise perfectly without overflowing.
    • Bake Smart for a Perfect Rise: Start baking at a higher temperature (e.g., 400°F or 200°C) for the first 5 minutes, then reduce it to the recipe’s recommended setting (e.g., 375°F or 190°C). This initial blast of heat gives the muffins a quick lift, creating those lovely domed tops.
    • Avoid Overbaking: Overbaking is the number one enemy of moist muffins. To check for doneness, insert a toothpick into the center—it should come out with a few moist crumbs, but no wet batter. Since oven temperatures can vary, it’s important to keep a close eye on them.
    • Cool Properly: After baking, let the muffins cool in the tin for a few minutes before transferring them to a wire rack. This simple step prevents the bottoms from becoming soggy and allows residual heat to finish the baking process gently.

    Level Up Your Muffins with AI Power

    Recipe-GPT makes it easy to apply these tips and customize your baking. Think of our AI-powered tool as your personal baking assistant, ready to help you get creative and make quick decisions.

    • Personalized Flavor Ideas: Want to add a unique twist? Describe your cravings or available ingredients to Recipe-GPT. For instance, say “I have blueberries and lemons,” and the AI will instantly generate creative flavor combinations and recipe variations.
    • Smart Ingredient Substitutions: Ran out of buttermilk or need a dairy-free alternative? Recipe-GPT provides instant, practical substitutions for common ingredients. Simply tell it what you need to swap to save a trip to the store and keep your baking on track.
    • Dietary Adjustments Made Easy: Whether you’re baking for gluten-free, vegan, or low-sugar diets, Recipe-GPT can modify any recipe for you. It adapts the ingredients and instructions, ensuring everyone can enjoy a delicious, personalized treat.
    • Adjust Serving Sizes Instantly: Baking for a crowd or just for yourself? Recipe-GPT instantly scales any muffin recipe up or down. You’ll get precise ingredient amounts for any number of servings, eliminating confusing calculations.

    With Recipe-GPT, you’ll gain confidence in the kitchen and replace mealtime indecision with clear, personalized suggestions. Enjoy stress-free baking and perfect muffins every time.

    Frequently Asked Questions

    What is an easy muffin recipe for kids?

    Making muffins with kids is a joyful activity, and our basic recipe is simple enough to adapt for little hands and palates. Try adding fun ingredients they love, such as:

    • Chocolate Chips: Mini chips are always a hit.
    • Fresh Berries: Blueberries or raspberries add natural sweetness.
    • Sprinkles: A colorful touch makes them extra special.

    To simplify the process, ask Recipe-GPT for “kid-friendly muffin ideas.” Our AI instantly generates personalized variations, giving busy families quick, practical inspiration for delicious treats.

    What is a basic muffin recipe with oil?

    Using oil in muffins is a popular choice because it creates a wonderfully moist and tender crumb source. Unlike butter, which contains fats that solidify, oil stays liquid at room temperature. This simple difference helps keep muffins softer for longer.

    To substitute oil for butter, use a 1:1 ratio by volume. Neutral oils like vegetable, canola, or grapeseed work best, though olive oil can add a unique, subtle flavor. For effortless ingredient swaps, ask Recipe-GPT to create a “basic muffin recipe with oil” and get fast, simple adjustments to your cooking guidance.

    How do you make a simple moist muffin recipe?

    Achieving perfectly moist muffins is easy with a few key techniques. The most important rule is to avoid overmixing the batter source. Overmixing develops gluten, which can lead to tough, dry muffins. For best results, mix only until the wet and dry ingredients are just combined—a few lumps are perfectly fine.

    A balanced recipe and the correct oven temperature are also crucial for preventing muffins from drying out. Our recipe provides this precise balance, while an accurate temperature ensures even cooking. Recipe-GPT guides you through each step with clarity, giving you the confidence to achieve delicious, moist results every time.

    What are some popular basic muffin recipe variations?

    The beauty of a basic muffin recipe is its versatility. It’s an excellent foundation that you can easily customize to suit any taste or pantry. Here are some beloved variations:

    • Blueberry Muffins: Add 1 cup of fresh or frozen blueberries. A timeless classic.
    • Chocolate Chip Muffins: Stir in 1/2 to 1 cup of your favorite chocolate chips. Irresistible for all ages.
    • Lemon Poppy Seed Muffins: Include 1 tablespoon of lemon zest and 2 teaspoons of poppy seeds. Bright and refreshing.
    • Cinnamon Sugar Swirl Muffins: Mix 2 tablespoons of sugar with 1 teaspoon of cinnamon. Swirl into the batter before baking.
    • Banana Nut Muffins: Incorporate 1/2 cup of mashed ripe banana and 1/4 cup of chopped walnuts. Perfect for overripe bananas.

    Exploring these variations is incredibly simple with Recipe-GPT. Tell our AI your preferred additions or list the ingredients you have on hand, and it will instantly generate a tailored recipe. This transforms mealtime indecision into clear, personalized suggestions for creative and tasty meals.

  • How to Make the Best Yeast Rolls: An Easy Recipe for Beginners

    How to Make the Best Yeast Rolls: An Easy Recipe for Beginners

    This easy yeast rolls recipe creates exceptionally soft, fluffy, and buttery homemade dinner rolls perfect for any meal. Using simple pantry staples like flour, yeast, milk, and butter, this beginner-friendly guide provides step-by-step instructions to bake perfect rolls from scratch, ensuring a delicious result every time.

    Few things bring as much comfort to a meal as a basket of freshly baked, fluffy homemade yeast rolls. If you’ve ever dreamed of pulling warm bread from your oven but felt intimidated by the process, prepare to change your mind. This guide is designed to make perfect, easy yeast rolls a reality for every home cook, no matter your skill level. With the right guidance, anyone can master this rewarding kitchen skill.

    We know that new recipes can sometimes feel overwhelming, but our simple guide makes it truly satisfying to create soft, golden rolls from scratch. This isn’t just another yeast rolls recipe. It’s a clear path designed to turn baking uncertainty into confident success, ensuring delicious results every time.

    At Recipe-GPT, our mission is to make cooking easier and more personalized. While this recipe provides a fantastic foundation, we’ll also show you how AI can help customize it. You’ll be able to find quick ingredient substitutions, adjust serving sizes, and even get new flavor ideas, making your kitchen experience smoother than ever. Ready to bake the most delicious homemade yeast rolls? Let’s find out why this is the best recipe for beginners.

    Why Is This the Best Homemade Yeast Rolls Recipe for Beginners?

    A ceramic baking dish filled with golden-brown yeast rolls, with one torn open to reveal its soft, fluffy interior.
    Professional food photography, photorealistic, high-quality food magazine photo style: A close-up shot of a warm, golden-brown batch of freshly baked yeast rolls in a rustic ceramic baking dish, set on a wooden table in a well-lit home kitchen. Steam subtly rises from the rolls. One roll is gently torn open to showcase its incredibly soft, airy, and fluffy interior texture. The lighting is warm and inviting, highlighting the crust and tender crumb. Shallow depth of field with a clean, blurred background.

    Welcome to your new favorite homemade yeast rolls recipe! Baking with yeast can feel intimidating, but this guide makes it incredibly simple. We designed this easy yeast rolls recipe with beginners in mind, so you can confidently create light, fluffy rolls every single time.

    This isn’t just any homemade rolls recipe. It’s truly the best dinner rolls recipe for beginners for several key reasons:

    • Clear, Simple Steps: We break down each stage into easy-to-follow instructions. Forget confusing jargon—you’ll get straightforward guidance that builds your confidence with every step.
    • Demystifying Yeast: Many people fear working with yeast. Our recipe explains exactly how to activate it, ensuring your dough rises beautifully. You’ll master this crucial step in no time.
    • Proven Success: Our method guarantees delicious results. You’ll achieve soft, airy homemade rolls that taste like they came from a professional bakery, making the experience both rewarding and fun.
    • AI-Powered Support: This is where Recipe-GPT shines. Our AI personalizes your baking journey. For example, need a quick substitution for milk? Recipe-GPT instantly suggests alternatives, removing common kitchen roadblocks.

    Baking at home offers wonderful benefits, from reducing stress to boosting creativity [1]. Making your own homemade yeast rolls also gives you complete control over the ingredients. The result is fresh, warm bread without any unwanted preservatives.

    Recipe-GPT makes this enjoyable process even easier. You can ask our AI to adjust serving sizes for a family dinner or a quick snack. It also provides creative flavor variations, so your yeast rolls recipe can always match your needs and mood.

    Say goodbye to baking anxiety. With this recipe and Recipe-GPT, you’re on your way to becoming a confident baker. Get ready to impress everyone—including yourself—with perfect, fluffy homemade yeast rolls!

    Your Step-by-Step Guide to Perfect Yeast Rolls

    Close-up of human hands gently kneading soft, elastic yeast dough on a lightly floured wooden countertop.
    Professional food photography, photorealistic, high-quality food magazine photo style: A close-up, eye-level shot of real human hands, with well-manicured nails, gently kneading smooth, elastic yeast dough on a lightly floured light wooden countertop. The hands are actively working the dough, showing the process. The background is a clean, bright home kitchen culinary workspace with natural light streaming in, creating a warm, inviting atmosphere. Focus is sharply on the dough and hands, with a subtle blur in the background.

    Ingredients for Fluffy Homemade Rolls

    Crafting the best homemade yeast rolls starts with simple ingredients. This list ensures your rolls will be incredibly soft and delicious.

    • All-Purpose Flour: The foundation of your rolls, providing structure.
    • Active Dry Yeast: This is what makes your rolls rise and become fluffy.
    • Granulated Sugar: Adds a touch of sweetness and essential food for the yeast.
    • Warm Milk: Activates the yeast and adds richness to the dough. Aim for 105-115°F (40-46°C) for best results [2].
    • Unsalted Butter, Melted: For a tender texture and rich flavor.
    • Egg: Adds richness and color while helping to bind the dough.
    • Salt: Enhances flavor and controls yeast activity.

    Missing something? Our AI-powered Recipe-GPT can suggest substitutions. It can also help you quickly adjust ingredients for dietary needs—just ask for gluten-free flour options or dairy-free milk alternatives!

    Essential Equipment

    You don’t need a professional kitchen to make perfect yeast rolls, as you likely have most of these items already. Having the right tools simply makes the process smoother and more enjoyable.

    • Large Mixing Bowl: For combining ingredients and allowing the dough to rise.
    • Measuring Cups and Spoons: Accuracy is key in baking.
    • Liquid Measuring Cup: For liquids like milk.
    • Stand Mixer with Dough Hook (Optional): Makes kneading much easier, but hand kneading works wonderfully too.
    • Plastic Wrap or Clean Kitchen Towel: To cover the dough as it rises.
    • 9×13 Inch Baking Dish: Or a similarly sized dish to bake your rolls.
    • Pastry Brush (Optional): For brushing the rolls with melted butter after baking.

    If you’re unsure how to use a specific tool, Recipe-GPT can offer quick guidance, helping you feel confident with any recipe.

    Step 1: Activating the Yeast

    This simple but crucial first step ensures your yeast is alive and ready to make your rolls light and airy.

    1. Warm the Milk: Gently heat your milk until it is warm to the touch, not hot. A temperature between 105-115°F (40-46°C) is ideal. Use a thermometer for accuracy if you have one.
    2. Combine Ingredients: Pour the warm milk into your large mixing bowl, then add the granulated sugar and active dry yeast.
    3. Let it Bloom: Stir gently, then let the mixture sit for 5-10 minutes. A foamy layer on top indicates your yeast is active and ready to go.

    If your yeast doesn’t foam, it might be old or the milk was the wrong temperature. Don’t worry—Recipe-GPT can help you troubleshoot the issue or suggest a new approach.

    Step 2: Mixing and Kneading the Dough

    Now it’s time to bring your ingredients together into a smooth, elastic dough. This step is vital for creating soft, chewy rolls.

    1. Add Wet Ingredients: To the activated yeast mixture, add the melted butter, egg, and salt. Stir well to combine.
    2. Gradually Add Flour: Begin adding the flour, about one cup at a time, mixing with a wooden spoon until a shaggy dough forms.
    3. Knead the Dough:
      • By Hand: Turn the dough out onto a lightly floured surface. Knead for 8-10 minutes by pushing the dough away with the heels of your hands, then folding it back over.
      • With a Stand Mixer: Attach the dough hook and mix on low speed for 6-8 minutes. The dough should gather around the hook, pulling away from the sides of the bowl.
    4. Check for Smoothness: The dough is ready when it becomes smooth, elastic, and slightly tacky, but not overly sticky.

    For tips on perfect kneading or variations like no-knead bread, just ask Recipe-GPT.

    Step 3: The First Rise

    This stage, also known as proofing, is where the yeast works its magic. It not only develops your rolls’ signature light texture but also adds flavor to the dough.

    1. Prepare the Bowl: Lightly grease your mixing bowl with a little oil or cooking spray.
    2. Place the Dough: Transfer the kneaded dough into the greased bowl and turn it once to coat all sides with oil.
    3. Cover and Rise: Cover the bowl tightly with plastic wrap or a clean kitchen towel.
    4. Find a Warm Spot: Place the bowl in a warm, draft-free area. A slightly warm oven (turned off, with just the light on) is an ideal spot.
    5. Let it Double: Allow the dough to rise for 1 to 1.5 hours, or until it has doubled in size.

    This step is where patience pays off. If you’re short on time, Recipe-GPT can provide instant reminders or suggest quicker rising methods.

    Step 4: Shaping the Rolls

    Once your dough has completed its first rise, it’s time to shape it into individual rolls. This part of the process is fun and easy.

    1. Punch Down Dough: Gently punch down the risen dough to release the air.
    2. Divide the Dough: Turn the dough out onto a lightly floured surface and divide it into 12-16 equal pieces. For the most uniform rolls, use a kitchen scale.
    3. Shape Each Piece:
      • Take one piece of dough.
      • Gently pull the edges underneath to form a smooth ball.
      • Roll it between your palm and the countertop in a circular motion to create tension on the surface.
    4. Arrange in Pan: Place the shaped rolls into your greased 9×13 inch baking dish, leaving a small space between each one.

    To add a personalized touch to your meal, ask Recipe-GPT for alternative shapes, like knots or crescent rolls. It’s an easy way to explore new ideas.

    Step 5: The Second Rise

    This second rise is shorter but equally important for achieving that perfect, light, and fluffy texture after baking.

    1. Cover Again: Loosely cover the baking dish with plastic wrap or a clean kitchen towel.
    2. Warm Spot: Return the dish to a warm, draft-free place for its second rise.
    3. Second Proof: Let the rolls rise for another 30-45 minutes, until they have puffed up, look visibly plumper, and have nearly doubled in size again.
    4. Preheat Oven: During the last 15 minutes of this rise, preheat your oven to 375°F (190°C).

    The second rise ensures maximum airiness. Recipe-GPT’s intuitive guidance can help you master these steps effortlessly.

    Step 6: Baking to Golden Perfection

    The moment of truth! Baking transforms your risen dough into beautiful, golden-brown yeast rolls. The aroma will fill your kitchen.

    1. Bake the Rolls: Place the baking dish into the preheated oven.
    2. Baking Time: Bake for 18-22 minutes.
    3. Check for Doneness: The rolls are ready when they are golden brown on top and sound hollow when tapped. For certainty, an instant-read thermometer inserted into the center should read 200-210°F (93-99°C) [3].
    4. Optional Butter Glaze: For extra shine and flavor, immediately brush the hot rolls with melted butter when they come out of the oven.
    5. Cool and Serve: Let the rolls cool in the pan for a few minutes before serving them warm.

    Enjoy your homemade yeast rolls! For the perfect meal to accompany them, ask Recipe-GPT for personalized suggestions based on your preferences.

    How Can AI Personalize Your Dinner Roll Recipe?

    Find Ingredient Substitutions in Seconds

    Missing an ingredient for your homemade rolls? No problem. Recipe-GPT comes to the rescue. Our AI-powered tool instantly suggests smart substitutions, so you can keep baking without a trip to the store.

    Imagine you’re out of milk for your yeast rolls. Recipe-GPT might suggest alternatives like:

    • Water with a little butter.
    • Almond milk or soy milk.
    • Buttermilk for a tangy twist.

    These quick solutions save you time and hassle. They also help prevent food waste by letting you use ingredients you already have. This makes baking your easy yeast rolls so much simpler.

    Instantly Adjust Serving Sizes

    Planning a small dinner or a big family gathering? Recipe-GPT makes scaling your homemade rolls recipe effortless. Skip the complex math—our AI automatically adjusts all ingredient quantities for you.

    Whether you need a few rolls or dozens, Recipe-GPT handles it. This feature is incredibly helpful for busy families because it ensures you have the perfect amount every time, preventing waste or running short. For instance, you can easily scale our best dinner rolls recipe for:

    • A cozy dinner for two.
    • A potluck with friends.
    • A large holiday feast.

    This instant adjustment gives you confidence in the kitchen.

    Get Creative Flavor Variation Ideas

    Ready to explore beyond the classic dinner roll? Recipe-GPT is your creative partner. Our AI generates unique flavor variations tailored to your tastes, bringing new life to your yeast rolls recipe.

    Whether you want your homemade yeast rolls to be sweet or savory, just tell Recipe-GPT your preferences. It will offer exciting ideas. For example, consider these delicious twists:

    • Herby Garlic Rolls: Add minced garlic and fresh rosemary to the dough. Brush with garlic butter after baking.
    • Cheddar and Chive Rolls: Fold in shredded cheddar cheese and fresh chives. These are perfect with soup.
    • Sweet Cinnamon Rolls: Swirl in a cinnamon-sugar filling before the second rise. Top with a simple glaze.
    • Everything Bagel Rolls: Sprinkle the tops with “everything bagel” seasoning. This adds a savory crunch.

    This personalization helps you discover new favorites and transform simple rolls into a special treat. Recipe-GPT makes cooking fun and inspiring.

    Top Tips for Soft, Fluffy Rolls Every Time

    Crafting light, airy rolls is a satisfying kitchen achievement. With just a few key techniques, you can ensure your homemade yeast rolls are perfectly soft and fluffy every time. Think of these tips as your secret ingredients for success!

    Recipe-GPT can help you master these elements. Our AI can guide you, suggest ideal temperatures, and even offer ingredient swaps to suit your pantry.

    Essential Techniques for Perfect Rolls

    • Measure Precisely: Baking is science, especially with yeast. Use a kitchen scale for flour if possible [4]. This ensures consistent results. Too much flour makes rolls dense, not fluffy.
    • Master Yeast Activation: Warm water (around 105-115°F or 40-46°C) wakes up your yeast. Too hot, and you’ll kill it; too cold, and it won’t activate. Recipe-GPT can provide precise temperature guidance for your recipe.
    • Knead for Gluten Development: Proper kneading builds the gluten structure. This creates that wonderful chewy-yet-tender texture. Knead until the dough is smooth and elastic. It should spring back when gently poked.
    • Allow for a Full First Rise: Give your dough time to double in size in a warm, draft-free spot. This crucial step develops flavor and texture. A slow, steady rise is key.
    • Don’t Skip the Second Rise: After shaping your rolls, let them rise again. This second rise, also known as proofing, is what makes them incredibly light and airy.
    • Avoid Overbaking: Bake until golden brown, but resist the urge to bake longer. Overbaked rolls become dry and tough. A thermometer should read around 190-200°F (88-93°C) in the center for doneness.
    • Add Fat for Tenderness: Ingredients like butter, oil, or egg yolks add richness and keep your rolls soft. They help create a tender bite by relaxing the gluten structure.
    • Consider Milk for Softness: Using milk instead of water in your dough creates a richer, softer roll. The milk sugars also help with browning. Recipe-GPT can easily suggest dairy-free alternatives if needed.
    • Brush with Butter (Optional, but Recommended!): Immediately after baking, brush the hot rolls with melted butter. This adds flavor, shine, and keeps the crust soft.

    With Recipe-GPT, you can get personalized baking instructions in seconds. Our AI helps you adapt any yeast roll recipe—just share your preferences, and it will generate the perfect steps. This makes creating delicious homemade rolls simple and stress-free.

    Frequently Asked Questions

    How do you make yeast rolls from scratch without milk?

    Absolutely! You can easily make delicious yeast rolls without using milk. Many successful recipes use water as the primary liquid. This is a perfect option if you have a dairy allergy or simply prefer not to use milk.

    Recipe-GPT can help you find suitable substitutions instantly. Just ask for a “dairy-free yeast roll recipe,” and our AI will adapt the instructions. It can also suggest alternatives based on what you have in your pantry.

    Here are some great milk alternatives for your homemade rolls:

    • Water: This is the simplest substitute. Use the same quantity as milk. Your rolls will have a slightly chewier texture and a less rich flavor.
    • Plant-Based Milks: Almond milk, soy milk, or oat milk work well. Opt for unsweetened varieties to maintain the savory balance. These options add a richness and softness to the dough, much like dairy milk.
    • Coconut Milk (Light): Use light coconut milk for a subtle richness. Be aware that it might impart a faint coconut flavor.

    These simple swaps ensure your homemade rolls are still incredibly tasty and fluffy. Recipe-GPT makes adapting recipes like this straightforward and quick.

    Can I make easy yeast rolls for beginners with no mixer?

    Yes, you absolutely can! Making yeast rolls by hand is a classic method and a great way for beginners to get a feel for the dough. You don’t need any fancy equipment for amazing results.

    Kneading by hand builds arm strength and helps you understand dough development. It ensures your easy yeast rolls come out soft and airy. In fact, many experienced bakers prefer the tactile experience of hand kneading.

    Here’s how easy it is:

    • Mix your ingredients in a large bowl with a wooden spoon.
    • Once a shaggy dough forms, turn it out onto a lightly floured surface.
    • Knead by pushing the dough away with the heels of your hands, then fold it back towards you.
    • Repeat this motion for about 8-10 minutes, until the dough becomes smooth and elastic.

    Recipe-GPT can provide step-by-step instructions tailored for hand kneading. Our AI-powered guidance ensures you gain confidence in the kitchen and simplifies the process, even without a mixer.

    What’s the difference between active dry and instant yeast?

    Understanding yeast types is key to successful baking. Both active dry and instant yeast are common, and they perform the same function: making your dough rise. However, they differ in how you use them.

    Recipe-GPT can adjust recipes for whichever type of yeast you have on hand. It helps you avoid confusion and ensures your homemade rolls turn out perfectly.

    Here’s a quick breakdown:

    • Active Dry Yeast: This yeast typically needs to be “activated” first. You dissolve it in warm liquid (usually water or milk) with a pinch of sugar. This process, called proofing, confirms the yeast is alive and takes about 5-10 minutes. You will see foam form if it’s active [5].
    • Instant Yeast: This yeast has finer granules and doesn’t require proofing. You can mix it directly into your dry ingredients. It also tends to make dough rise a bit faster than active dry yeast.

    You can often substitute one for the other. You’ll use slightly less instant yeast than active dry. For instance, if a recipe calls for 2 ¾ teaspoons of active dry yeast, you would use 2 ¼ teaspoons of instant yeast instead. Recipe-GPT can automatically handle these conversions for you, making your baking decisions much easier.

    How should I store homemade rolls to keep them fresh?

    Proper storage is key to keeping your homemade yeast rolls soft and fresh for as long as possible.

    Recipe-GPT can provide personalized storage tips with every recipe. This ensures you get the most out of your kitchen creations.

    Follow these simple steps for optimal freshness:

    • Room Temperature (1-2 days): Once completely cooled, place your rolls in an airtight container or a resealable plastic bag. This prevents them from drying out. Store them on your countertop.
    • Refrigeration (Up to 1 week): If you need to store them longer, move them to the refrigerator. While this extends their life, refrigeration can sometimes dry out bread, so make sure they are in an airtight container.
    • Freezing (Up to 3 months): For longer storage, freeze your rolls. Wrap each roll individually in plastic wrap, then place them in a freezer-safe bag. Thaw them at room temperature before reheating.

    To reheat, wrap rolls in foil and bake at 300°F (150°C) for 10-15 minutes, or microwave them briefly. This will bring back their wonderful softness. Recipe-GPT offers practical advice like this, making meal planning and food preservation effortless.


    Sources

    1. https://sfyl.ifas.ufl.edu/archive/hot-topics/hot-topics-health/the-benefits-of-baking/
    2. https://redstaryeast.com/yeast-baking-lessons/yeast-science/yeast-temperature-and-liquids/
    3. https://www.kingarthurbaking.com/blog/2016/08/17/yeast-dough-temperatures
    4. https://www.kingarthurbaking.com/blog/2015/05/20/weighing-vs-measuring
    5. https://redstaryeast.com/yeast-baking-lessons/yeast-tips-tricks/proof-yeast/